Lesson:
The Java Tutorials have been written for JDK 8.Java教程是为JDK 8编写的。Examples and practices described in this page don't take advantage of improvements introduced in later releases and might use technology no longer available.本页中描述的示例和实践没有利用后续版本中引入的改进,并且可能使用不再可用的技术。See Java Language Changes for a summary of updated language features in Java SE 9 and subsequent releases.有关Java SE 9及其后续版本中更新的语言特性的摘要,请参阅Java语言更改。
See JDK Release Notes for information about new features, enhancements, and removed or deprecated options for all JDK releases.有关所有JDK版本的新功能、增强功能以及已删除或不推荐的选项的信息,请参阅JDK发行说明。
Adding the Application Logic添加应用程序逻辑
It is now time to add in the application logic. 现在是添加应用程序逻辑的时候了。
Step 1: Change the Default Variable Names步骤1:更改默认变量名
The figure below shows the default variable names as they currently appear within the Inspector. 下图显示了当前在检查器中显示的默认变量名。For each component, the variable name appears first, followed by the object's type in square brackets. 对于每个组件,变量名首先出现,然后是方括号中的对象类型。For example, 例如,jTextField1 [JTextField] means that "jTextField1" is the variable name and "JTextField" is its type.jTextField1 [JTextField]意味着“jTextField1”是变量名,“JTextField”是其类型。
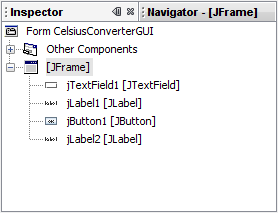
Default Variable Names默认变量名
The default names are not very relevant in the context of this application, so it makes sense to change them from their defaults to something that is more meaningful. 默认名称在这个应用程序的上下文中不是很相关,因此将它们从默认名称更改为更有意义的名称是有意义的。Right-click each variable name and choose "Change variable name." When you are finished, the variable names should appear as follows:右键单击每个变量名并选择“更改变量名”。完成后,变量名应显示如下:
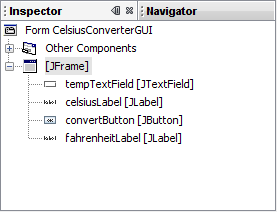
New Variable Names新变量名
The new variable names are "tempTextField", "celsiusLabel", "convertButton", and "fahrenheitLabel." 新的变量名为“tentextfield”、“celsiusLabel”、“convertButton”和“fahrenheitLabel”Each change that you make in the Inspector will automatically propagate its way back into the source code. 在检查器中所做的每个更改都将自动传播回源代码。You can rest assured that compilation will not fail due to typos or mistakes of that nature — mistakes that are common when editing by hand. 您可以放心,编译不会因为打字错误或此类错误而失败—手工编辑时常见的错误。
Step 2: Register the Event Listeners步骤2:注册事件侦听器
When an end-user interacts with a Swing GUI component (such as clicking the Convert button), that component will generate a special kind of object — called an event object — which it will then broadcast to any other objects that have previously registered themselves as listeners for that event. 当最终用户与Swing GUI组件交互时(如单击Convert按钮),该组件将生成一种特殊类型的对象—称为事件对象—然后将其广播给先前已将其自身注册为该事件的侦听器的任何其他对象。The NetBeans IDE makes event listener registration extremely simple:NetBeans IDE使事件侦听器注册非常简单:
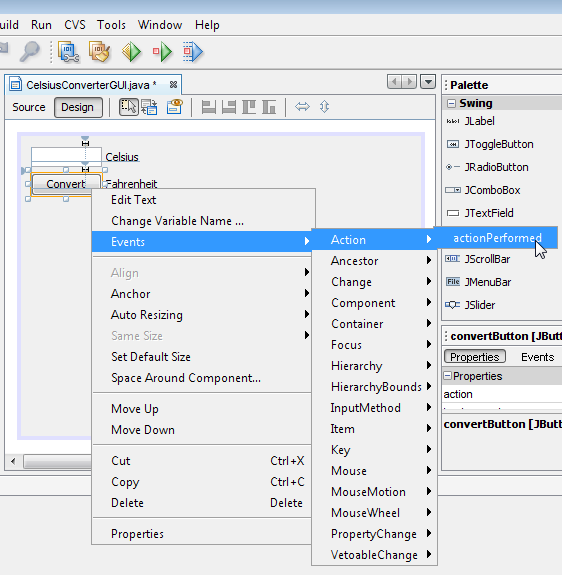
In the Design Area, click on the Convert button to select it. 在设计区域中,单击转换按钮将其选中。Make sure that only the Convert button is selected (if the JFrame itself is also selected, this step will not work.) 确保仅选择了转换按钮(如果同时选择了JFrame本身,则此步骤将不起作用)Right-click the Convert button and choose Events -> Action -> ActionPerformed. 右键单击转换按钮,然后选择事件->操作->执行的操作。This will generate the required event-handling code, leaving you with empty method bodies in which to add your own functionality:这将生成所需的事件处理代码,留下空的方法体,可以在其中添加自己的功能:
There are many different event types representing the various kinds of actions that an end-user can take (clicking the mouse triggers one type of event, typing at the keyboard triggers another, moving the mouse yet another, and so on.) 有许多不同的事件类型表示终端用户可以采取的各种操作(单击鼠标触发一种类型的事件,在键盘上打字触发另一种类型,移动鼠标再移动另一种,等等)Our application is only concerned with the ActionEvent; for more information about event handling, see Writing Event Listeners.应用程序只关注ActionEvent;有关事件处理的详细信息,请参阅编写事件侦听器。
Step 3: Add the Temperature Conversion Code步骤3:添加温度转换代码
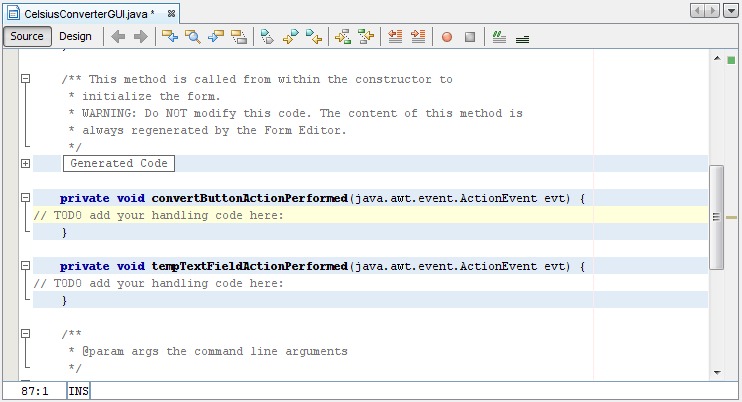
The final step is to simply paste the temperature conversion code into the empty method body. 最后一步是简单地将温度转换代码粘贴到空的方法体中。The following code is all that is necessary to convert a temperature from Celsius to Fahrenheit:以下代码是将温度从摄氏度转换为华氏度所需的全部代码:
Note:
This example is not localizable because the 此示例不可本地化,因为parseDouble method is not localizable. parseDouble方法不可本地化。This code snippet is for illustration purposes only. 此代码段仅用于说明目的。A more robust implementation would use the Scanner class to parse the user input.更健壮的实现将使用Scanner类来解析用户输入。
//Parse degrees Celsius as a double and convert to Fahrenheit.
int tempFahr = (int)((Double.parseDouble(tempTextField.getText()))
* 1.8 + 32);
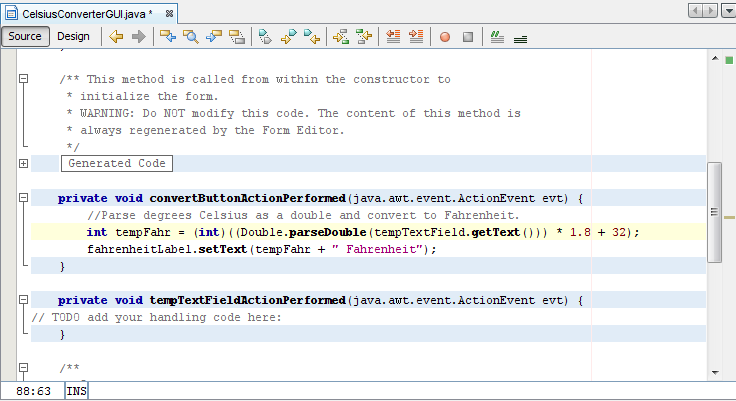
fahrenheitLabel.setText(tempFahr + " Fahrenheit");Simply copy this code and paste it into the convertButtonActionPerformed method as shown below:只需复制此代码并将其粘贴到convertButtonActionPerformed方法中,如下所示:
With the conversion code in place, the application is now complete. 转换代码就绪后,应用程序现在完成。
Step 4: Run the Application步骤4:运行应用程序
Running the application is simply a matter of choosing Run -> Run Main Project within the NetBeans IDE. 运行应用程序只需在NetBeans IDE中选择“运行”->“运行主程序”即可。The first time you run this application, you will be prompted with a dialog asking to set 第一次运行此应用程序时,将出现一个对话框,要求将CelsiusConverterGUI as the main class for this project. CelsiusConverterGUI设置为该项目的主类。Click the OK button, and when the program finishes compiling, you should see the application running in its own window.单击OK按钮,当程序完成编译时,您将看到应用程序在其自己的窗口中运行。
Congratulations! You have completed your first Swing application!祝贺!您已经完成了第一个Swing应用程序!