Lesson: Using Other Swing Features
The Java Tutorials have been written for JDK 8.Java教程是为JDK 8编写的。Examples and practices described in this page don't take advantage of improvements introduced in later releases and might use technology no longer available.本页中描述的示例和实践没有利用后续版本中引入的改进,并且可能使用不再可用的技术。See Java Language Changes for a summary of updated language features in Java SE 9 and subsequent releases.有关Java SE 9及其后续版本中更新的语言特性的摘要,请参阅Java语言更改。
See JDK Release Notes for information about new features, enhancements, and removed or deprecated options for all JDK releases.有关所有JDK版本的新功能、增强功能以及已删除或不推荐的选项的信息,请参阅JDK发行说明。
How to Decorate Components with the JLayer Class如何使用JLayer类装饰组件
The JLayer class is a flexible and powerful decorator for Swing components. JLayer类是Swing组件的灵活而强大的装饰器。It enables you to draw on components and respond to component events without modifying the underlying component directly.它使您能够在不直接修改底层组件的情况下绘制组件并响应组件事件。
This document describes examples that show the power of the 本文档描述了展示JLayer class. JLayer类功能的示例。Full source code is available.完整的源代码可用。
Using the使用JLayerClassJLayer类Using the使用LayerUIClassLayerUI类Drawing on Components部件图纸Responding to Events对事件的响应Animating a Busy Indicator设置忙碌指示器的动画Validating Text Fields验证文本字段
For a brief introduction to the material on this page, watch the following video.有关本页材料的简要介绍,请观看以下视频。
A JavaScript-enabled web browser and an Internet connection are required for the video. 视频需要支持JavaScript的web浏览器和Internet连接。If you cannot see the video, try viewing it at YouTube.如果看不到视频,请尝试在YouTube上观看。
Using the JLayer Class使用JLayer类
JLayer ClassThe javax.swing.JLayer class is half of a team. javax.swing.JLayer类是团队的一半。The other half is the 另一半是javax.swing.plaf.LayerUI class. javax.swing.plaf.LayerUI类。Suppose you want to do some custom drawing atop a 假设您想在JButton object (decorate the JButton object). JButton对象上进行一些自定义绘图(装饰JButton物体)。The component you want to decorate is the target.您要装饰的组件就是目标。
Create the target component.创建目标组件。Create an instance of a创建LayerUIsubclass to do the drawing.LayerUI子类的实例以进行绘图。Create a创建包装目标和JLayerobject that wraps the target and theLayerUIobject.LayerUI对象的JLayer对象。Use the就像使用目标组件一样,在用户界面中使用JLayerobject in your user interface just as you would use the target component.JLayer对象。
For example, to add an instance of a 例如,要将JPanel subclass to a JFrame object, you would do something similar to this:JPanel子类的实例添加到JFrame对象,您可以执行类似的操作:
JFrame f = new JFrame();

JPanel panel = createPanel();

f.add (panel);
To decorate the 要装饰JPanel object, do something similar to this instead:JPanel对象,请改为执行类似的操作:
JFrame f = new JFrame();

JPanel panel = createPanel();
LayerUI<JPanel> layerUI = new MyLayerUISubclass();
JLayer<JPanel> jlayer = new JLayer<JPanel>(panel, layerUI);

f.add (jlayer);
Use generics to ensure that the 使用泛型来确保JPanel object and the LayerUI object are for compatible types. JPanel对象和LayerUI对象适用于兼容的类型。In the previous example, both the 在前面的示例中,JLayer object and the LayerUI object are used with the JPanel class.JLayer对象和LayerUI对象都与JPanel类一起使用。
The JLayer class is usually generified with the exact type of its view component, while the LayerUI class is designed to be used with JLayer classes of its generic parameter or any of its ancestors.JLayer类通常使用其视图组件的确切类型进行泛化,而LayerUI类则设计用于其泛型参数的JLayers类或其任何祖先。
For example, a 例如,LayerUI<JComponent> object can be used with a JLayer<AbstractButton> object.LayerUI<JComponent>对象可以与JLayer<AbstractButton>对象一起使用。
A LayerUI object is responsible for custom decoration and event handling for a JLayer object. LayerUI对象负责JLayer对象的自定义装饰和事件处理。When you create an instance of a 当您创建LayerUI subclass, your custom behavior can be applicable to every JLayer object with an appropriate generic type. LayerUI子类的实例时,您的自定义行为可以适用于具有适当泛型类型的每个JLayer对象。That is why the 这就是为什么JLayer class is final; all custom behavior is encapsulated in your LayerUI subclass, so there is no need to make a JLayer subclass.JLayer类是final;所有自定义行为都封装在您的LayerUI子类中,所以不需要创建JLayer子类。
Using the LayerUI Class使用LayerUI类
LayerUI ClassThe LayerUI class inherits most of its behavior from the ComponentUI class. LayerUI类继承了ComponentUI类的大部分行为。Here are the most commonly overridden methods:以下是最常见的重写方法:
The当需要绘制目标组件时,将调用paint(Graphics g, JComponent c)method is called when the target component needs to be drawn.paint(Graphics g, JComponent c)方法。To render the component in the same way that Swing renders it, call the要以与Swing渲染组件相同的方式渲染组件,请调用super.paint(g, c)method.super.paint(g, c)方法。The当LayerUI子类的实例与组件关联时,将调用installUI(JComponent c)method is called when an instance of yourLayerUIsubclass is associated with a component.installUI(JComponent c)方法。Perform any necessary initializations here.在此处执行任何必要的初始化。The component that is passed in is the corresponding传入的组件是相应的JLayerobject.JLayer对象。Retrieve the target component with the使用JLayerclass'getView()method.JLayer类的getView()方法检索目标组件。The当uninstallUI(JComponent c)method is called when an instance of yourLayerUIsubclass is no longer associated with the given component. Clean up here if necessary.LayerUI子类的实例不再与给定组件关联时,将调用uninstallUI(JComponent c)方法。如有必要,请清理此处。
Drawing on Components部件图纸
To use the 要使用JLayer class, you need a good LayerUI subclass. JLayer类,您需要一个好的LayerUI子类。The simplest kinds of 最简单的LayerUI classes change how components are drawn. LayerUI类改变了组件的绘制方式。Here is one, for example, that paints a transparent color gradient on a component.例如,这是一个在组件上绘制透明颜色渐变的组件。
class WallpaperLayerUI extends LayerUI<JComponent> {
  @Override
  public void paint(Graphics g, JComponent c) {
    super.paint(g, c);

    Graphics2D g2 = (Graphics2D) g.create();

    int w = c.getWidth();
    int h = c.getHeight();
    g2.setComposite(AlphaComposite.getInstance(
            AlphaComposite.SRC_OVER, .5f));
    g2.setPaint(new GradientPaint(0, 0, Color.yellow, 0, h, Color.red));
    g2.fillRect(0, 0, w, h);

    g2.dispose();
  }
}
The paint() method is where the custom drawing takes place. paint()方法是进行自定义绘图的地方。The call to the 对super.paint() method draws the contents of the JPanel object. super.paint()方法的调用绘制JPanel对象的内容。After setting up a 50% transparent composite, the color gradient is drawn.设置50%透明合成后,绘制颜色渐变。
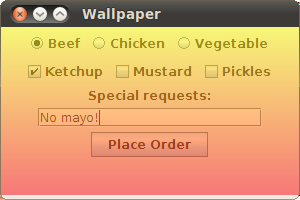
After the 定义LayerUI subclass is defined, using it is simple. LayerUI子类后,使用它很简单。Here is some source code that uses the 下面是一些使用WallpaperLayerUI class:WallpaperLayerUI类的源代码:
import java.awt.*;
import javax.swing.*;
import javax.swing.plaf.LayerUI;

public class Wallpaper {
  public static void main(String[] args) {
    javax.swing.SwingUtilities.invokeLater(new Runnable() {
      public void run() {
        createUI();
      }
    });
  }

  public static void createUI() {
    JFrame f = new JFrame("Wallpaper");

    JPanel panel = createPanel();
    LayerUI<JComponent> layerUI = new WallpaperLayerUI();
    JLayer<JComponent> jlayer = new JLayer<JComponent>(panel, layerUI);

    f.add (jlayer);

    f.setSize(300, 200);
    f.setDefaultCloseOperation (JFrame.EXIT_ON_CLOSE);
    f.setLocationRelativeTo (null);
    f.setVisible (true);
  }

  private static JPanel createPanel() {
    JPanel p = new JPanel();

    ButtonGroup entreeGroup = new ButtonGroup();
    JRadioButton radioButton;
    p.add(radioButton = new JRadioButton("Beef", true));
    entreeGroup.add(radioButton);
    p.add(radioButton = new JRadioButton("Chicken"));
    entreeGroup.add(radioButton);
    p.add(radioButton = new JRadioButton("Vegetable"));
    entreeGroup.add(radioButton);

    p.add(new JCheckBox("Ketchup"));
    p.add(new JCheckBox("Mustard"));
    p.add(new JCheckBox("Pickles"));

    p.add(new JLabel("Special requests:"));
    p.add(new JTextField(20));

    JButton orderButton = new JButton("Place Order");
    p.add(orderButton);

    return p;
  }
}
Here is the result:结果如下:
Source code:源代码:
Run with Java Web Start:使用Java Web启动运行:

The LayerUI class' paint() method gives you complete control over how a component is drawn. LayerUI类的paint()方法可以完全控制组件的绘制方式。Here is another 下面是另一个LayerUI subclass that shows how the entire contents of a panel can be modified using Java 2D image processing:LayerUI子类,它显示了如何使用Java 2D图像处理修改面板的全部内容:
class BlurLayerUI extends LayerUI<JComponent> {
private BufferedImage mOffscreenImage;
private BufferedImageOp mOperation;
public BlurLayerUI() {
float ninth = 1.0f / 9.0f;
float[] blurKernel = {
ninth, ninth, ninth,
ninth, ninth, ninth,
ninth, ninth, ninth
};
mOperation = new ConvolveOp(
new Kernel(3, 3, blurKernel),
ConvolveOp.EDGE_NO_OP, null);
}
@Override
public void paint (Graphics g, JComponent c) {
int w = c.getWidth();
int h = c.getHeight();
if (w == 0 || h == 0) {
return;
}
// Only create the off-screen image if the one we have
// is the wrong size.
if (mOffscreenImage == null ||
mOffscreenImage.getWidth() != w ||
mOffscreenImage.getHeight() != h) {
mOffscreenImage = new BufferedImage(w, h, BufferedImage.TYPE_INT_RGB);
}
Graphics2D ig2 = mOffscreenImage.createGraphics();
ig2.setClip(g.getClip());
super.paint(ig2, c);
ig2.dispose();
Graphics2D g2 = (Graphics2D)g;
g2.drawImage(mOffscreenImage, mOperation, 0, 0);
}
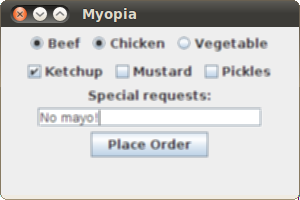
}In the 在paint() method, the panel is rendered into an off-screen image. paint()方法中,面板被渲染为屏幕外图像。The off-screen image is processed with a convolution operator, then drawn to the screen.屏幕外的图像用卷积算子处理,然后绘制到屏幕上。
The entire user interface is still live, just blurry:整个用户界面仍然活跃,只是模糊不清:
Source code:源代码:
Run with Java Web Start:使用Java Web启动运行:
Responding to Events对事件的响应
Your 您的LayerUI subclass can also receive all of the events of its corresponding component. LayerUI子类还可以接收其相应组件的所有事件。However, the 然而,JLayer instance must register its interest in specific types of events. JLayer实例必须注册其对特定类型事件的兴趣。This happens with the 这是通过JLayer class' setLayerEventMask() method. JLayer类的setLayerEventMask()方法实现的。Typically, however, this call is made from initialization performed in the 然而,通常,此调用是通过在LayerUI class' installUI() method.LayerUI类的installUI()方法中执行的初始化进行的。
For example, the following excerpt shows a portion of a 例如,以下摘录显示了LayerUI subclass that registers to receive mouse and mouse motion events.LayerUI子类的一部分,该子类注册以接收鼠标和鼠标运动事件。
public void installUI(JComponent c) {
  super.installUI(c);
  JLayer jlayer = (JLayer)c;
  jlayer.setLayerEventMask(
    AWTEvent.MOUSE_EVENT_MASK |
    AWTEvent.MOUSE_MOTION_EVENT_MASK
  );
}
All events going to your 所有进入JLayer subclass get routed to an event handler method whose name matches the event type. JLayer子类的事件都被路由到一个名称与事件类型匹配的事件处理程序方法。For example, you can respond to mouse and mouse motion events by overriding corresponding methods:例如,您可以通过覆盖相应的方法来响应鼠标和鼠标运动事件:
protected void processMouseEvent(MouseEvent e, JLayer l) {
  // ...
}

protected void processMouseMotionEvent(MouseEvent e, JLayer l) {
  // ...
}
The following is a 下面是一个LayerUI subclass that draws a translucent circle wherever the mouse moves inside a panel.LayerUI子类,它在鼠标在面板内移动的任何位置绘制一个半透明的圆。
class SpotlightLayerUI extends LayerUI<JPanel> {
  private boolean mActive;
  private int mX, mY;

  @Override
  public void installUI(JComponent c) {
    super.installUI(c);
    JLayer jlayer = (JLayer)c;
    jlayer.setLayerEventMask(
      AWTEvent.MOUSE_EVENT_MASK |
      AWTEvent.MOUSE_MOTION_EVENT_MASK
    );
  }

  @Override
  public void uninstallUI(JComponent c) {
    JLayer jlayer = (JLayer)c;
    jlayer.setLayerEventMask(0);
    super.uninstallUI(c);
  }

  @Override
  public void paint (Graphics g, JComponent c) {
    Graphics2D g2 = (Graphics2D)g.create();

    // Paint the view.
    super.paint (g2, c);

    if (mActive) {
      // Create a radial gradient, transparent in the middle.
      java.awt.geom.Point2D center = new java.awt.geom.Point2D.Float(mX, mY);
      float radius = 72;
      float[] dist = {0.0f, 1.0f};
      Color[] colors = {new Color(0.0f, 0.0f, 0.0f, 0.0f), Color.BLACK};
      RadialGradientPaint p =
          new RadialGradientPaint(center, radius, dist, colors);
      g2.setPaint(p);
      g2.setComposite(AlphaComposite.getInstance(
          AlphaComposite.SRC_OVER, .6f));
      g2.fillRect(0, 0, c.getWidth(), c.getHeight());
    }

    g2.dispose();
  }

  @Override
  protected void processMouseEvent(MouseEvent e, JLayer l) {
    if (e.getID() == MouseEvent.MOUSE_ENTERED) mActive = true;
    if (e.getID() == MouseEvent.MOUSE_EXITED) mActive = false;
    l.repaint();
  }

  @Override
  protected void processMouseMotionEvent(MouseEvent e, JLayer l) {
    Point p = SwingUtilities.convertPoint(e.getComponent(), e.getPoint(), l);
    mX = p.x;
    mY = p.y;
    l.repaint();
  }
}
The mActive variable indicates whether or not the mouse is inside the coordinates of the panel. mActive变量指示鼠标是否在面板坐标范围内。In the 在installUI() method, the setLayerEventMask() method is called to indicate the LayerUI subclass' interest in receiving mouse and mouse motion events.installUI()方法中,调用setLayerEventMask()方法以指示LayerUI子类对接收鼠标和鼠标运动事件的兴趣。
In the 在processMouseEvent() method, the mActive flag is set depending on the position of the mouse. processMouseEvent()方法中,根据鼠标的位置设置mActive标志。In the 在processMouseMotionEvent() method, the coordinates of the mouse movement are stored in the mX and mY member variables so that they can be used later in the paint() method.processMouseMotionEvent()方法中,鼠标移动的坐标存储在mX和mY成员变量中,以便稍后在paint()方法中将其使用。
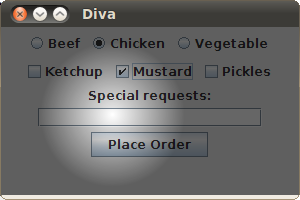
The paint() method shows the default appearance of the panel, then overlays a radial gradient for a spotlight effect:paint()方法显示面板的默认外观,然后为聚光灯效果叠加径向渐变:
Source code:源代码:
Run with Java Web Start:使用Java Web启动运行:
Animating a Busy Indicator设置忙碌指示器的动画
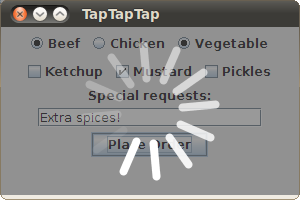
This example is an animated busy indicator. 此示例是一个动画忙指示器。It demonstrates animation in a 它演示了LayerUI subclass and features a fade-in and fade-out. LayerUI子类中的动画,并具有淡入淡出功能。It is more complicated that the previous examples, but it is based on the same principle of defining a 它比前面的示例更复杂,但它基于为自定义绘图定义paint() method for custom drawing.paint()方法的相同原则。
Click the Place Order button to see the busy indicator for 4 seconds. 单击“下单”按钮可查看繁忙指示灯4秒钟。Notice how the panel is grayed out and the indicator spins. 请注意面板是如何变灰的,指示器是如何旋转的。The elements of the indicator have varying levels of transparency.指标的要素具有不同的透明度。
The LayerUI subclass, the WaitLayerUI class, shows how to fire property change events to update the component. LayerUI子类WaitLayerUI类显示了如何激发属性更改事件来更新组件。The WaitLayerUI class uses a Timer object to update its state 24 times a second. WaitLayerUI类使用Timer对象每秒24次更新其状态。This happens in the timer's target method, the 这发生在计时器的目标方法actionPerformed() method.actionPerformed()方法中。
The actionPerformed() method uses the firePropertyChange() method to indicate that the internal state was updated. actionPerformed()方法使用firePropertyChange()方法指示内部状态已更新。This triggers a call to the 这将触发对applyPropertyChange() method, which repaints the JLayer object:applyPropertyChange()方法的调用,该方法将重新绘制JLayer对象:
Source code:源代码:
Run with Java Web Start:使用Java Web启动运行:
Validating Text Fields验证文本字段
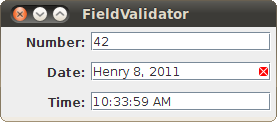
The final example in this document shows how the 本文中的最后一个示例展示了如何使用JLayer class can be used to decorate text fields to show if they contain valid data. JLayer类来修饰文本字段,以显示它们是否包含有效数据。While the other examples use the 虽然其他示例使用JLayer class to wrap panels or general components, this example shows how to wrap a JFormattedTextField component specifically. JLayer类包装面板或常规组件,但此示例显示了如何具体包装JFormattedTextField组件。It also demonstrates that a single 它还演示了单个LayerUI subclass implementation can be used for multiple JLayer instances.LayerUI子类实现可以用于多个JLayer实例。
The JLayer class is used to provide a visual indication for fields that have invalid data. JLayer类用于为包含无效数据的字段提供可视化指示。When the ValidationLayerUI class paints the text field, it draws a red X if the field contents cannot be parsed. ValidationLayerUI类绘制文本字段时,如果无法解析字段内容,它将绘制一个红色的X。Here is an example:下面是一个示例:
Source code:源代码:
Run with Java Web Start:使用Java Web启动运行: