Spreadsheets in GatsbyJS Sites
GatsbyJS is a framework for creating websites. It uses React components for page templates and GraphQL for loading data.
SheetJS is a JavaScript library for reading and writing data from spreadsheets.
This demo uses GatsbyJS and SheetJS (through the gatsby-transformer-excel1
transformer) to pull data from a spreadsheet and display the content in a page.
The "Complete Example" section includes a complete website powered by an XLSX spreadsheet.
gatsby-transformer-excel is maintained by the Gatsby core team and all bugs
should be directed to the main Gatsby project. If it is determined to be a bug
in the parsing logic, issues should then be raised with the SheetJS team.
gatsby-transformer-excel uses an older version of the library. It can be
overridden through a package.json override in the latest versions of NodeJS:
{
  "overrides": {
    "xlsx": "https://cdn.sheetjs.com/xlsx-0.20.1/xlsx-0.20.1.tgz"
  }
}
GatsbyJS collects telemetry by default. The telemetry subcommand can disable it:
npx gatsby telemetry --disable
Integration Details
In the GatsbyJS data system, source plugins read from data sources and generate nodes represent raw data. Transformer plugins transform these nodes into other nodes that represent processed data for use in pages.
This example uses gatsby-source-filesystem2 to read files from the
filesystem and gatsby-transformer-excel transformer to perform the transform.
Installation
The SheetJS NodeJS module will be
referenced by gatsby-transformer-excel.
Before installing, to ensure that the transformer uses the latest version of the
library, the overrides section must be added to package.json:
{
  "overrides": {
    "xlsx": "https://cdn.sheetjs.com/xlsx-0.20.1/xlsx-0.20.1.tgz"
  }
}
gatsby-transformer-excel and gatsby-source-filesystem should be installed
after installing SheetJS modules:
- npm
- pnpm
- Yarn
npx gatsby telemetry --disable
npm i --save https://cdn.sheetjs.com/xlsx-0.20.1/xlsx-0.20.1.tgz
npm i --save gatsby-transformer-excel gatsby-source-filesystem
npx gatsby telemetry --disable
pnpm install https://cdn.sheetjs.com/xlsx-0.20.1/xlsx-0.20.1.tgz
pnpm install gatsby-transformer-excel gatsby-source-filesystem
npx gatsby telemetry --disable
yarn add https://cdn.sheetjs.com/xlsx-0.20.1/xlsx-0.20.1.tgz
yarn add gatsby-transformer-excel gatsby-source-filesystem
GraphQL details
Under the hood, gatsby-transformer-excel uses the SheetJS read3 method to
parse the workbook into a SheetJS workbook4. Each worksheet is extracted from
the workbook. The sheet_to_json method5 generates row objects using the
headers in the first row as keys.
Consider the following worksheet:

Assuming the file name is pres.xlsx and the data is stored in "Sheet1", the
following nodes will be created:
[
  { Name: "Bill Clinton", Index: 42, type: "PresXlsxSheet1" },
  { Name: "GeorgeW Bush", Index: 43, type: "PresXlsxSheet1" },
  { Name: "Barack Obama", Index: 44, type: "PresXlsxSheet1" },
  { Name: "Donald Trump", Index: 45, type: "PresXlsxSheet1" },
  { Name: "Joseph Biden", Index: 46, type: "PresXlsxSheet1" },
]
The type is a proper casing of the file name concatenated with the sheet name.
The following query pulls the Name and Index fields from each row:
{
  allPresXlsxSheet1 { # "all" followed by type
    edges {
      node { # each line in this block should be a field in the data
        Name
        Index
      }
    }
  }
}
Complete Example
This demo was tested on 2023 December 04 against [email protected]. The
generated project used [email protected] and [email protected].
Project setup
0) Disable GatsbyJS telemetry:
npx gatsby telemetry --disable
1) Create a template site:
npm init gatsby -- -y sheetjs-gatsby
2) Follow the on-screen instructions for starting the local development server:
cd sheetjs-gatsby
npm run develop
Open a web browser to the displayed URL (typically http://localhost:8000/)
3) Edit package.json and add the highlighted lines in the JSON object:
{
  "overrides": {
    "xlsx": "https://cdn.sheetjs.com/xlsx-0.20.1/xlsx-0.20.1.tgz"
  },
  "name": "sheetjs-gatsby",
  "version": "1.0.0",
4) Install the library and plugins:
npm i --save https://cdn.sheetjs.com/xlsx-0.20.1/xlsx-0.20.1.tgz
npm i --save gatsby-transformer-excel gatsby-source-filesystem
5) Make a src/data directory, download https://sheetjs.com/pres.xlsx, and
move the downloaded file into the new folder:
mkdir -p src/data
curl -L -o src/data/pres.xlsx https://sheetjs.com/pres.xlsx
6) Edit gatsby-config.js and add the following lines to the plugins array:
module.exports = {
  siteMetadata: {
    title: `sheetjs-gatsby`,
    siteUrl: `https://www.yourdomain.tld`,
  },
  plugins: [
    {
      resolve: `gatsby-source-filesystem`,
      options: {
        name: `data`,
        path: `${__dirname}/src/data/`,
      },
    },
    `gatsby-transformer-excel`,
  ],
}
Stop and restart the development server process (npm run develop).
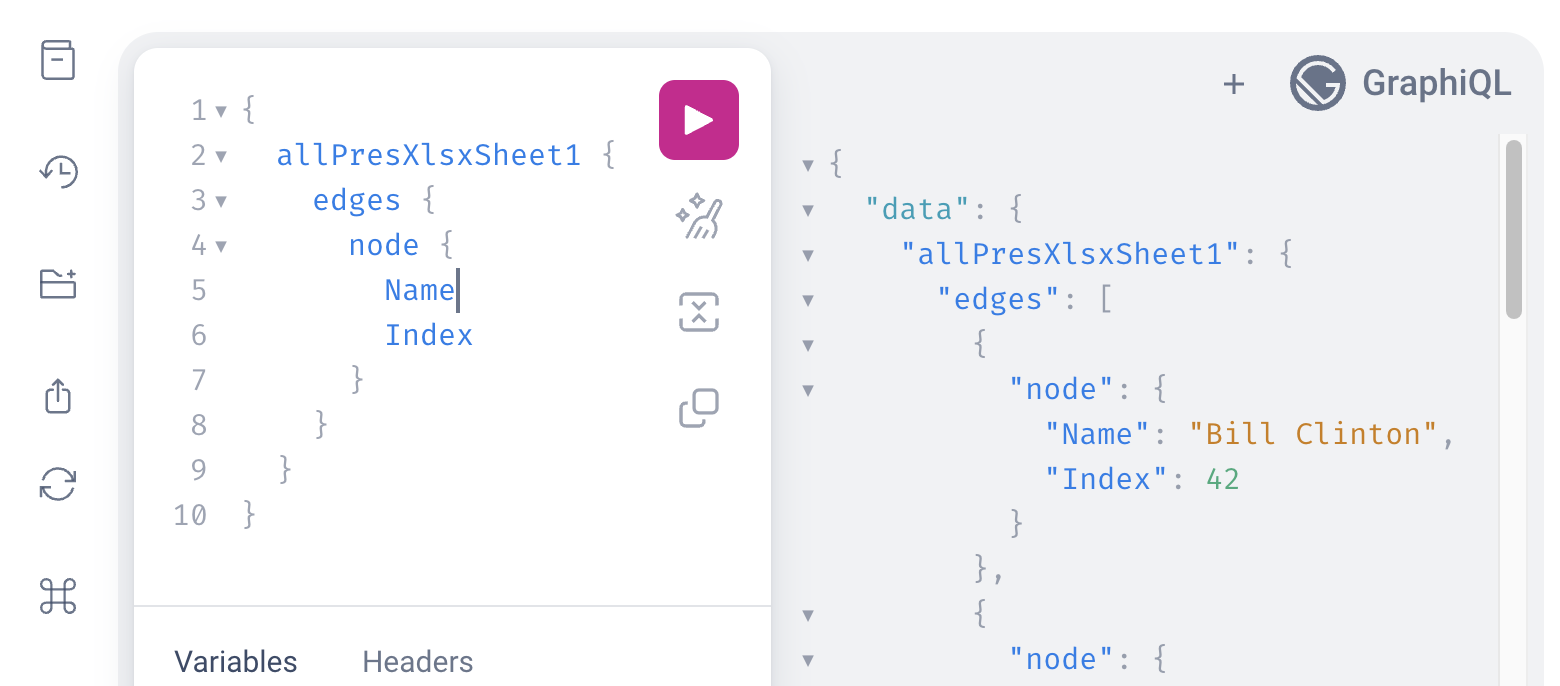
GraphiQL test
7) Open the GraphiQL editor. The output of the previous step displayed the URL
(typically http://localhost:8000/___graphql )
There is an editor in the left pane. Paste the following query into the editor:
{
  allPresXlsxSheet1 {
    edges {
      node {
        Name
        Index
      }
    }
  }
}
Press the Execute Query button (▶) and data should show up in the right pane:
React page
8) Create a new file src/pages/pres.js that uses the query and displays the result:
import { graphql } from "gatsby"
import * as React from "react"

export const query = graphql`query {
  allPresXlsxSheet1 {
    edges {
      node {
        Name
        Index
      }
    }
  }
}`;

const PageComponent = ({data}) => {
  return ( <pre>{JSON.stringify(data, 2, 2)}</pre> );
};
export default PageComponent;
After saving the file, access http://localhost:8000/pres in the browser. The
displayed JSON is the data that the component receives:
{
  "allPresXlsxSheet1": {
    "edges": [
      {
        "node": {
          "Name": "Bill Clinton",
          "Index": 42
        }
      },
  // ....
9) Change PageComponent to display a table based on the data:
import { graphql } from "gatsby"
import * as React from "react"

export const query = graphql`query {
  allPresXlsxSheet1 {
    edges {
      node {
        Name
        Index
      }
    }
  }
}`;

const PageComponent = ({data}) => {
  const rows = data.allPresXlsxSheet1.edges.map(r => r.node);
  return ( <table>
    <thead><tr><th>Name</th><th>Index</th></tr></thead>
    <tbody>{rows.map(row => ( <tr>
      <td>{row.Name}</td>
      <td>{row.Index}</td>
    </tr> ))}</tbody>
  </table> );
};

export default PageComponent;
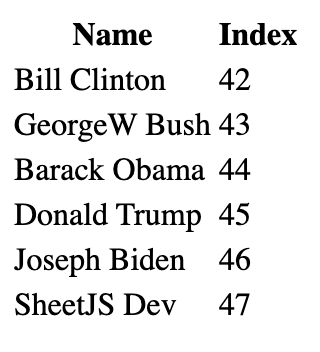
Going back to the browser, http://localhost:8000/pres will show a table:

Live refresh
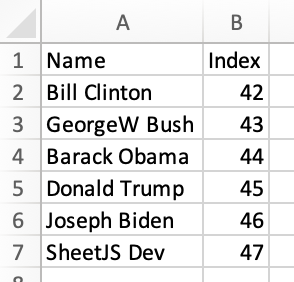
10) Open the file src/data/pres.xlsx in Excel or another spreadsheet editor.
Add a new row at the end of the file, setting cell A7 to "SheetJS Dev" and
cell B7 to 47. The sheet should look like the following screenshot:
Save the file and observe that the table has refreshed with the new data:
Static site
11) Stop the development server and build the site:
npm run build
The build output will confirm that the /pres route is static:
Pages

┌ src/pages/404.js
│ ├   /404/
│ └   /404.html
├ src/pages/index.js
│ └   /
└ src/pages/pres.js
  └   /pres/

  ╭────────────────────────────────────────────────────────────────╮
  │                                                                │
  │   (SSG) Generated at build time                                │
  │ D (DSG) Deferred static generation - page generated at runtime │
  │ ∞ (SSR) Server-side renders at runtime (uses getServerData)    │
  │ λ (Function) Gatsby function                                   │
  │                                                                │
  ╰────────────────────────────────────────────────────────────────╯
The generated page will be placed in public/pres/index.html.
12) Open public/pres/index.html with a text editor and search for "SheetJS".
There will be a HTML row:
<tr><td>SheetJS Dev</td><td>47</td></tr>
- The package is available as
gatsby-transformer-excelon the public NPM registry. It is also listed on the GatsbyJS plugin library.↩ - See the
gatsby-source-filesystemplugin in the GatsbyJS documentation↩ - See
readin "Reading Files"↩ - See "Workbook Object" for more details on the SheetJS workbook object.↩
- See
sheet_to_jsonin "Utilities"↩