8.3 Integrating CSS into HTML
There are several ways to associate CSS style statements with an HTML document. Strictly speaking, you have three options at your disposal:
-
Inline style
You write the CSS style specifications directly in the HTML element. -
Internal stylesheet
You specify the style statement internally in the header of the HTML document in thestyleelement. -
External stylesheet
You use an external stylesheet file and link it to the HTML document.
The following sections describe these three options in greater detail.
8.3.1 Style Statements Directly in the HTML Tag Using the HTML Attribute “style”
This is the worst way to make a CSS statement: writing the style statement(s) directly in the opening HTML tag using the global HTML attribute style. Within the style attribute, the same syntax and grammar applies to the value assignment as I described in Section 8.2.2. Concerning the logic, a selector isn’t needed because the HTML element is already specified in the opening tag to which this CSS rule is applied. Here’s a code snippet that shows how you can use such style statements within an opening HTML tag:
...
  <header style="background: #add8e6; padding: 2px;
                 text-align: center;">
  <h1 style="font-family: Verdana;">My cooking blog</h1>
  <p style="font-family: Verdana;">A blog with delicious recipes...</p>
  </header>
  <nav style="text-align: center;">
  <p style="font-family: Verdana;">
    <a href="#">blog</a> | <a href="#">recipes</a> |
    <a href="#">About me</a> | <a href="#">Legal notes</a>
  </p>
  </nav>
...
Listing 8.3 /examples/chapter008/8_3_1/index.html
Right away, we can see that in this small example, you’ll lose the overview if you insert the style statements of CSS directly into the HTML element (also referred to as inline styles ). Such a style statement within an HTML tag applies only to the HTML element in which that style statement was written. For example, statements have to be repeated as shown here with the p element with font-family, and if you keep adding style after style in this way and make yet another mistake, it becomes very tedious and usually even more error-prone. If you do this with all your web pages, you’ll have to change all web pages when you want to implement any changes. In addition, you would even have to customize every styled element in every single web page.
Can Style Statements Be Used Directly in the HTML Tag So That It Makes Sense?
The only—but also not very convincing—argument for the possibility to use a style directly in an HTML tag could be for testing or demonstration purposes, just to quickly see what something looks like with CSS, or maybe if you want to apply a style only at one specific place in the HTML document. Nevertheless, in most cases, you’re better off with the other options of including CSS in HTML because that reduces the maintenance effort enormously and provides you with extreme flexibility.
8.3.2 Style Statements in the Document Head Using the HTML Element <style>
The second option to write CSS style statements is in the HTML document head between <head> and </head>. When doing this, you mark the area for the style statements with the CSS rules with <style> and </style>.
Let’s take a look at a simple example:
<!doctype html>
<html lang="en">
  <head>
    <title>My cooking blog</title>
    <meta charset="UTF-8">
    <style>
       body { margin: 0px; }
       h1 {
         font-family: "Verdana", "Geneva";
         font-size: 200%;
         text-align: center;
       }
       p { font-family: "Verdana", "Geneva"; }
       ...
 <style>
  </head>
  <body>
  ...
  </body>
</html>
Listing 8.4 /examples/chapter008/8_3_2/index.html
The CSS rules with style statements that you write between <style> and </style> apply to the entire HTML document and thus to each HTML element for which you’ve written a selector. Here, you also can write several of those style areas within the HTML document head.
Meaningful Use for Style Statements in the HTML Document Head
This variant is often used to learn CSS because you have everything in one file, which makes it clearer for such purposes. In practice, this option can still be useful if you want to apply or restrict some CSS rules to only one HTML document. However, this method is less suitable for large projects, because you’d have to search and revise each document when changes or errors occur.
8.3.3 Integrating Style Statements from an External CSS File Using <link>
In most cases, when developing more extensive websites, the complete separation of HTML and CSS into separate files is probably the best solution. This is the only way to ensure that the layout is consistent for a larger web project. It also means that you usually have only one CSS file for several HTML documents, which you include in the HTML document with the link element within the HTML document head.
Type Description of a CSS File
Like an HTML document, a CSS file is a plain text file with the file extension .css (e.g., mystyle.css).
Thus, if you combine the CSS rules for formatting in an external CSS file, you only need to make changes in the one central location so that they apply to all other HTML documents that have integrated that CSS file and use the CSS rules.
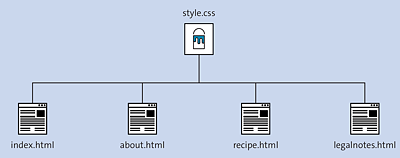
Figure 8.5 By Consolidating CSS Rules in One Place, Design Changes Are Much Easier and Faster to Implement
The following code snippet shows you how to include the CSS file with the HTML element <link> in the HTML document:
<!doctype html>
<html lang="en">
  <head>
    <title>My cooking blog</title>
    <meta charset="UTF-8">
    <link rel="stylesheet" href="style.css">
  </head>
  <body>
  ...
  </body>
</html>
Listing 8.5 /examples/chapter008/8_3_3/index.html
Although I’ve already described the link element in Chapter 3, Section 3.5, a few sentences should still be added here. You can use the href attribute to reference the desired CSS file (here, style.css) to be included in the HTML document. In the example, the file is located in the same directory as the HTML document, index.html. If this file is located in another directory or even on another server, you must add the corresponding path or URL. Via rel, you can write the relationship type of the element, which, with the attribute value stylesheet, means that just a stylesheet is to be included.
The code for the CSS file can be found in /examples/chapter008/8_3_3/style.css. The final result corresponds to Figure 8.3, shown earlier.
8.3.4 Combining CSS Rules in the Head Section and in External CSS Files
The question you’re probably asking yourself is which CSS rule takes precedence when you reference an external CSS file with the link element while using a range between <style> and </style>. This is absolutely legitimate and can be used to combine the CSS rules. Let’s take a look at a simple example:
<!doctype html>
<html lang="en">
  <head>
    <title>My cooking blog</title>
    <meta charset="UTF-8">
    <link rel="stylesheet" href="style.css">
    <style>
      p { text-align: center; }
    </style>
  </head>
  <body>
  <h1>A headline</h1>
  <p style="text-align: left;">First paragraph text ...</p>
  <p>Second paragraph text ...</p>

  </body>
</html>
Listing 8.6 /examples/chapter008/8_3_4/index.html
The external CSS file style.css contains only the following:
/* File: style.css */
p { text-align: right; color: gray; }
Listing 8.7 /examples/chapter008/8_3_4/style.css
If there’s a conflict of the same rules, the last rule written will take precedence. For example, if the link element comes after the style section, the CSS rule from the external CSS file will take precedence. However, if you still write a style statement in the opening HTML tag (as an inline style), then the CSS rule in the opening HTML tag takes precedence. CSS features that don’t overlap, such as the text color (gray) in the style.css file of the example, are combined with the existing CSS rules.
For this reason, in the example, p elements are displayed in gray color because there was no overlap with the color property. The first paragraph text, on the other hand, is left-aligned because the most local CSS rule in the HTML tag for the p element was written there as an inline style. The second paragraph, in turn, uses center alignment because the more local CSS rule for the p element was defined in the style section the document head. The specification of text-align: right; in the stylesheet file style.css, on the other hand, doesn’t get executed at all because there are more local CSS rules containing the text-align property for both p elements.
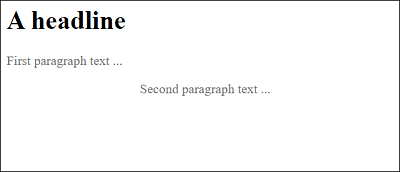
Figure 8.6 Result of Combining Style Statements within an HTML Tag in the <style> Section of the Document Head and in a Separate CSS File
You can even reference multiple CSS files using the link element. In that case, too, for the same HTML elements with different declarations of CSS features, those files will be combined. If a conflict exists between two CSS features that are the same but have different values for an HTML element, the style sheet that’s integrated at a later time overrides the specification of the previously integrated one.
Cascade
Because style statements can be integrated and combined in different ways, there must be a rule for this that decides which property takes precedence when there are competing CSS rules. The problem is solved in CSS by having the cascade calculate a weighting (a points system) for the rules and properties that determines the format applied to an element.
8.3.5 Recommendation: You Should Separate HTML and CSS
The previous sections have described the options you have for using CSS for websites. In the previous section, you may already have noticed how confusing it can get when you distribute CSS all over the HTML document. It’s obvious that when mixing these options, the overview is gone. In our example, the listed examples and the combination of different ways to use CSS served only to demonstrate what is allowed and theoretically possible. In practice, it’s recommended to write the CSS code in a separate file and include it in the HTML document head via the link element. Some of the advantages of using a central CSS file (refer to Figure 8.5) are listed here:
-
You have a consistent layout even for larger projects. All format properties that you defined in the central CSS file apply to all HTML documents in which this CSS file is included.
-
The effort for maintenance or design changes is considerably reduced because this work will be limited to the single CSS file, and the changes of the central file will immediately be available for all HTML documents.
-
The HTML documents will become smaller in size because they consist only of HTML. This also reduces loading time because the central stylesheet file only needs to be downloaded once and can then get cached in the web browser.
8.3.6 Testing Alternate Stylesheets during Development
Using the global title attribute, you can set up alternate style sheets within the link or style elements. This could be useful for development work in a team, for example, when you want to compare and test different CSS themes. A simple example of this is shown in Listing 8.8.
...<head>
    <title>Alternate CSS</title>
    <meta charset="UTF-8" />
    <link rel="stylesheet" href="normal.css" title="Bright mode" />
    <link rel="alternate stylesheet" href="dark.css" title="Dark mode" />
    <link rel="alternate stylesheet" href="light.css" title="Light" />
</head>
...
Listing 8.8 /examples/chapter008/8_3_5/index.html
In this example, three stylesheets with different color schemes are provided. Because all three of them contain the title attribute, the first element (title="Bright mode") is used for rendering. The other stylesheets should be selectable by the web browser as an alternative. For example, in Firefox, you can select an alternate stylesheet specified in the title attribute from the View menu in the Web Page Style submenu.
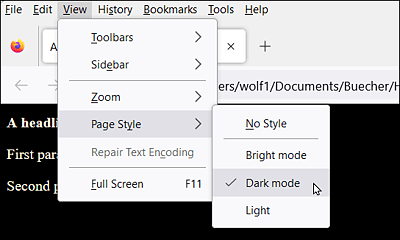
Figure 8.7 Selecting an Alternate Stylesheet in Firefox
As mentioned earlier, this feature can be very handy when you work in a team of developers. However, because it isn’t supported by all web browsers, you shouldn’t use it for public web projects. Firefox has been able to handle this function since version 3. For other web browsers, however, you need an extension. If you use multiple alternate stylesheets, the following rules apply:
-
If
alternatehasn’t been used with therelattribute and notitleattribute has been used, the stylesheet will be preferred. -
If a style has the
titleattribute and hasn’t been marked asalternate, it will be used as the default stylesheet. -
If a style has the
titleattribute and has been marked asalternate, it will be listed in the menu list.
8.3.7 Integrating Style Statements from an External CSS File Using “@import”
Besides the HTML syntax for integrating an external CSS file in an HTML document using the link element, there’s a second possibility in CSS: the @import rule. Here’s a simple example of how you can reference an external CSS file with this rule:
...
  <head>
    <title>My cooking blog</title>
    <meta charset="UTF-8">
    <style>
@import url("style.css");
    </style>
  </head>
...
Listing 8.9 /examples/chapter008/8_3_6/index.html
The @import rule must also be written in the HTML document head between <head> and </head>. To be more precise, it must be written in the style section between <style> and </style>. You can use @import url("style.css"); to include the CSS file in the HTML document. Again, the stylesheet file is assumed to be in the same directory as the HTML document.
In practice, this example makes little sense compared to importing via the link element and is only meant to illustrate the use of the @import rule. More often, you’ll include a stylesheet via <link> and import other stylesheets from that stylesheet via the @import rule.
The important aspect about this @import rule is that you write it at the beginning of the style section. There must be no other CSS statement before the @import rule in the style section. After that, on the other hand, you can write CSS rules as you like. You can also include other external CSS files with the @import rule.
8.3.8 Media-Specific Stylesheets for Specific Output Devices
If you want to set stylesheets for a specific output medium, you can do so by using the media attribute in the link element. This gives you the option, for example, to apply a stylesheet only to certain output media. The following example demonstrates how you can specify a media-specific stylesheet for the screen and a different stylesheet for the printer:
...
  <head>
    <title>My cooking blog</title>
    <meta charset="UTF-8">
    <link rel="stylesheet" type="text/css"
     media="screen" href="style.css">
    <link rel="stylesheet" type="text/css"
     media="print" href="print.css">
  </head>
...
Listing 8.10 /examples/chapter008/8_3_7/index.html
If the output device is a screen (media="screen"), then the HTML document is formatted using style.css. If, on the other hand, the output medium is a printer (media="print"), the document will be formatted using print.css. Alternatively, you can use the @import rule for this instead of linking the CSS files via the link element:
...
  <head>
    <title>My cooking blog</title>
    <meta charset="UTF-8">
    <style>
      @import url("style.css") screen;
      @import url("print.css") print;
    <style>
  </head>
...
Table 8.1 provides an overview of the media-specific attribute values you can use to assign media-specific stylesheets.
|
Attribute Value |
Output Device |
|---|---|
|
|
All output devices (default value) |
|
|
Printer |
|
|
Screen-oriented output devices |
Table 8.1 Media-Specific Output Devices for Stylesheets That Can Be Assigned to the “media” Attribute
Apart from that, there are other media types or device classes such as aural, braille, embossed, handheld, projection, speech, tty or tv, that have been classified as deprecated since Media Queries Level 4, so you should refrain from using them. However, you can also assign multiple values separated by commas. If you don’t specify an attribute value, the attribute value all will be used, which the stylesheet is used with regardless of the output medium.
“@media” Statements within a Stylesheet
You don’t need to swap out the media-specific stylesheet statements to a separate file; you can also use the @media rule within a stylesheet to create individual CSS rules for specific media. Here’s an example of how you can optimize the font size specifically for printing:
p { font-size: 1.6em; }
@media print {
  p { font-size: 10pt; }
}
For the p element, you use 1.6em as the font size with em as the unit of measure for a relative font size for all media except print. For printing, on the other hand, you can use the @media rule and print to use a pt (= point) unit of measure suitable for printing, with 10pt as the font size. I’ll deal with the topic of units of measure for fonts separately because it’s not relevant at this point. This is just about using the @media rule.
8.3.9 Media-Specific Stylesheets with CSS
In addition to the options just shown, there are also media-specific stylesheets (also called media queries) that play a key role in responsive web design. For this purpose, logical operators (and, not) have been introduced, allowing you to perform queries about a wide variety of media properties, such as usable screen width or screen orientation (portrait/landscape for tablets). For example, if you want to provide a special stylesheet for a 1,080-pixel screen, you can do so as follows:
<link rel="stylesheet" media="screen and (min-width: 1080px)"
      href="style1080.css">
This will include the CSS file style1080.css in the HTML document if the media has a screen and and that screen is at least 1,080 pixels wide (min-width: 1080px). Many more such media properties are available for this, just like min-width here. But those media queries will be described separately in this book. Before that, you’ll be introduced to the basics of CSS.