Aggregation Pipeline Builder聚合管道生成器
On this page
New in version 1.14.0版本1.14.0中的新功能
The Aggregation Pipeline Builder in MongoDB Compass provides the ability to create aggregation pipelines to process data. MongoDB Compass中的聚合管道生成器提供了创建聚合管道以处理数据的能力。In aggregation pipelines, documents in a collection or view pass through stages where MongoDB Compass processes them into a set of aggregated results. 在聚合管道中,集合或视图中的文档经过阶段,MongoDB Compass将其处理为一组聚合结果。You can change the stages and results to suit your needs.您可以根据需要更改阶段和结果。
To start building an aggregation pipeline for a collection or view, choose the collection and click the Aggregations tab. 要开始为集合或视图构建聚合管道,请选择集合并单击“聚合”选项卡。A blank aggregation pipeline displays. 将显示一个空白的聚合管道。The Preview of Documents in the Collection section of the Aggregations view displays 20 documents sampled from the current collection.“聚合”视图的“集合”部分中的“文档预览”将显示从当前集合中采样的20个文档。
You can:你可以:
Create a new aggregation pipeline创建新的聚合管道Save a pipeline保存管道Open a saved pipeline打开保存的管道Set the documents limit or auto preview documents设置文档限制或自动预览文档View or change pipeline settings查看或更改管道设置Specify custom collation指定自定义排序规则Create a view from pipeline results从管道结果创建视图Import a pipeline from plain text从纯文本导入管道Export a pipeline to Java, Node, C#, and Python 3将管道导出到Java、Node、C#和Python 3
Limitations局限性
The $out stage is not available if you are connected to a Data Lake.如果连接到数据湖,$out阶段不可用。
Create an Aggregation Pipeline创建聚合管道
Add an aggregation pipeline stage.添加聚合管道阶段。
In the aggregation pipeline pane in the lower-left corner, click the Select... dropdown and select the aggregation pipeline stage to use for the first stage of the pipeline:在左下角的聚合管道窗格中,单击“选择……”下拉列表并选择要用于管道第一阶段的聚合管道阶段:

Fill in the pipeline stage.填充管道阶段。
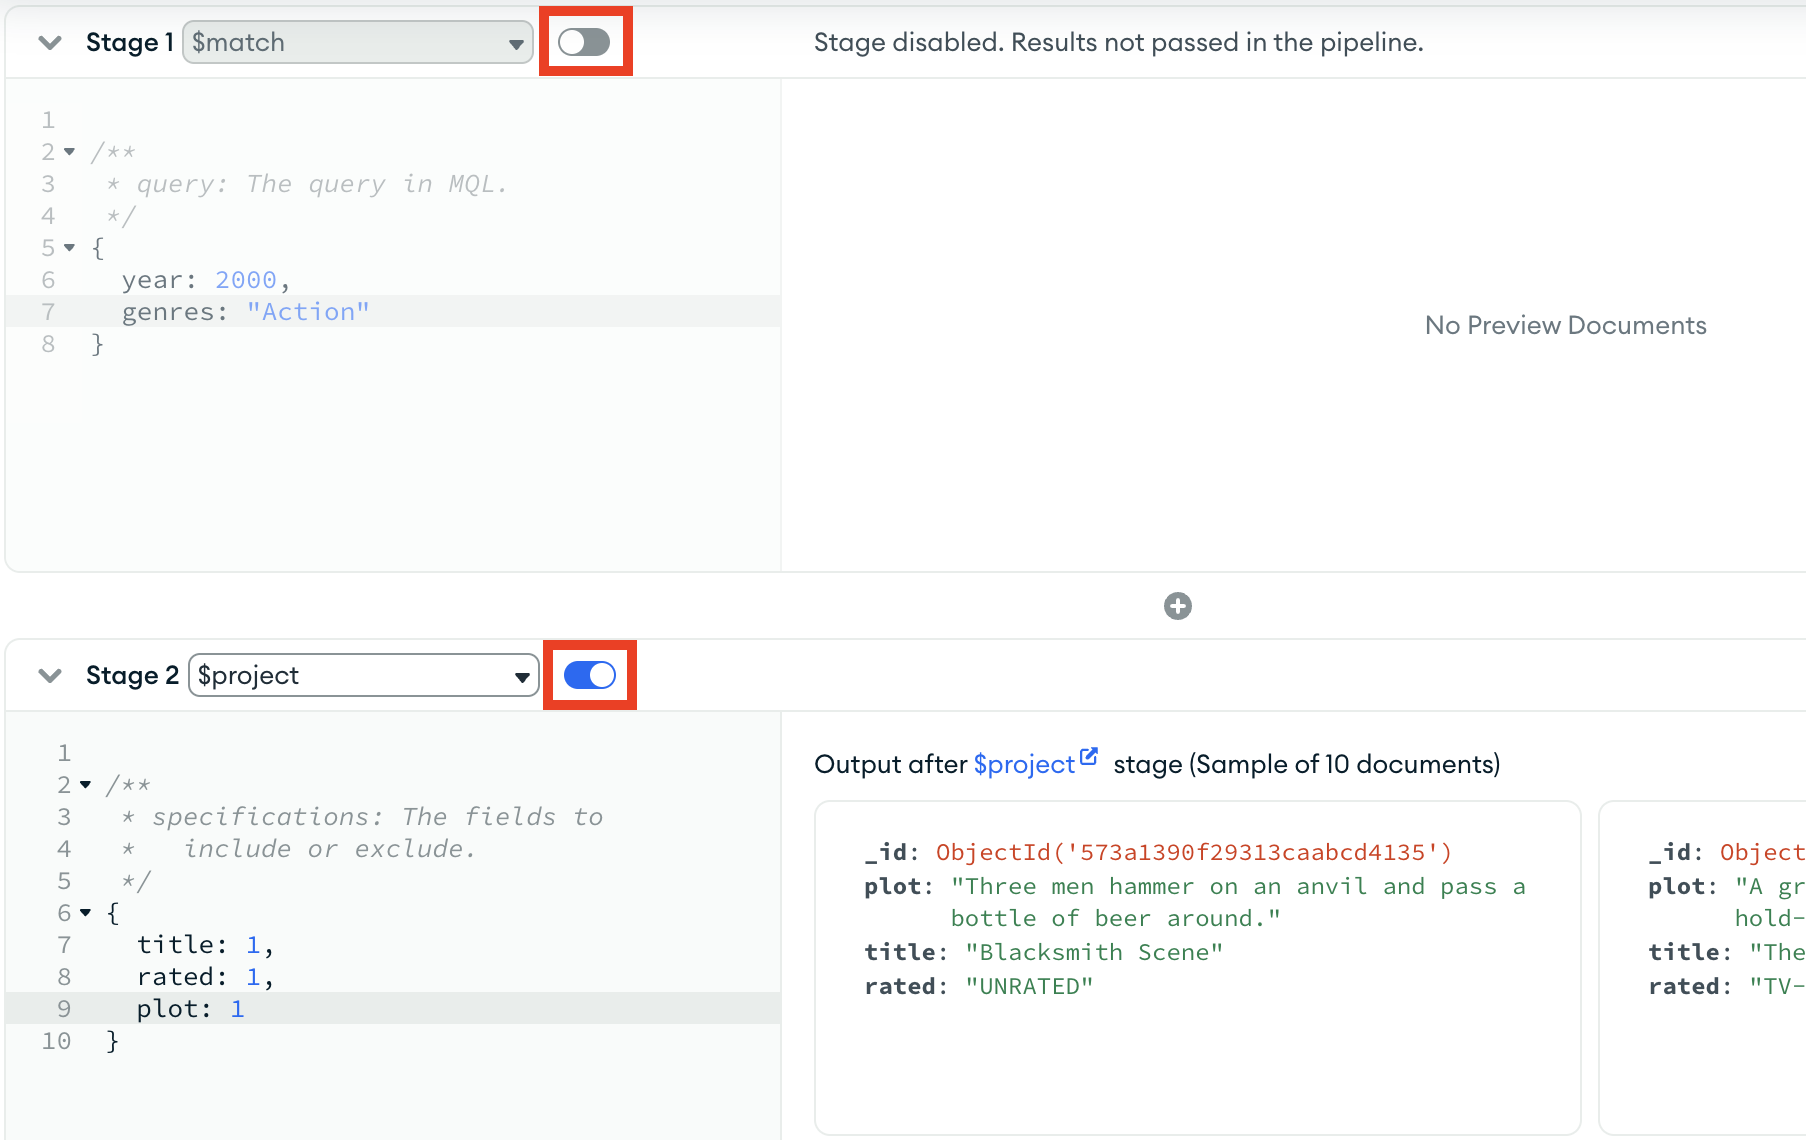
Fill in your selected stage. 填写你选择的阶段。If you enable Auto Preview, preview documents update automatically to the right of the stage to reflect the results of your pipeline as it progresses. 如果启用“自动预览”,预览文档将自动更新到阶段右侧,以反映管道运行过程中的结果。You can adjust the width of the pipeline stage by dragging its border to the right.可以通过向右拖动管道阶段的边界来调整管道阶段的宽度。

Add additional pipeline stages.添加其他管道阶段。
Click Add Stage to add additional aggregation stages below your last aggregation stage. 单击“添加阶段”在上一个聚合阶段下方添加其他聚合阶段。Repeat steps 1 and 2 for each additional stage.对每个附加阶段重复步骤1和2。
The toggle to the right of the name of each pipeline stage dictates whether that stage is included in the pipeline. 每个管道阶段名称右侧的切换指示该阶段是否包含在管道中。Toggling a pipeline stage also updates the pipeline preview, which reflects whether or not that stage is included.切换管道阶段也会更新管道预览,该预览反映是否包含该阶段。
Save a Pipeline保存管道
You can save a pipeline so that you can find it later. 您可以保存管道,以便以后可以找到它。If you load a saved pipeline, you can change it without changing the original saved copy. 如果加载保存的管道,则可以在不更改原始保存副本的情况下对其进行更改。You can also create a view from your pipeline results.还可以根据管道结果创建视图。
To save your pipeline:要保存管道,请执行以下操作:
Click the Save button at the top of the pipeline builder.单击管道生成器顶部的“保存”按钮。Enter a name for your pipeline.输入管道的名称。Click Save.单击“保存”。
Open a Saved Pipeline打开保存的管道
Click the Folder icon at the top left of the pipeline builder.单击管道生成器左上角的“文件夹”图标。Hover over the pipeline you want to open and click Open.将鼠标悬停在要打开的管道上,然后单击“打开”。In the modal, click Open Pipeline.在模式中,单击“打开管道”。
Set the Documents Limit or Auto Preview Documents设置文档限制或自动预览文档
Use the toggles at the top of the pipeline builder to set the limit on the number of sampled documents or to enable auto preview.使用pipeline builder顶部的切换设置采样文档的数量限制或启用自动预览。
|
|
|
|---|---|
Sample Mode |
$group、$bucket和$bucketAuto阶段。 |
Auto Preview |
|
View or Change Pipeline Settings查看或更改管道设置
To view and change pipeline settings:要查看和更改管道设置,请执行以下操作:
Click the gear icon at the upper right of the pipeline builder to open the Settings panel.单击管道生成器右上角的齿轮图标以打开“设置”面板。Change any of the following pipeline settings.更改以下任何管道设置。Option选项Description描述Default默认值Comment ModeWhen enabled, adds helper comments to each stage.启用后,将帮助器注释添加到每个阶段。EnabledNumber of Preview DocumentsNumber of documents to show in the preview.要在预览中显示的文档数。20Max TimeCumulative time limit in milliseconds for processing the pipeline.处理管道的累积时间限制(毫秒)。Use this option to limit the waiting time if the pipeline stops responding.如果管道停止响应,请使用此选项限制等待时间。5000LimitWhen Sample Mode is enabled, specifies the number of documents passed to $group, $bucket, and $bucketAuto stages.启用“示例模式”时,指定传递给$group、$bucket和$bucketAuto阶段的文档数。Lower limits improve pipeline running time, but may miss documents.下限可以提高管道运行时间,但可能会丢失文档。100000Click Apply to save changes and close the Settings panel.单击“应用”保存更改并关闭“设置”面板。
Specify Custom Collation指定自定义排序规则
Use custom collation to specify language-specific rules for string comparison, such as rules for letter case and accent marks.使用自定义排序规则为字符串比较指定特定于语言的规则,例如字母大小写和重音符号的规则。
To specify a custom collation:要指定自定义排序规则,请执行以下操作:
Click the Collation button at the top of the pipeline builder.单击管道生成器顶部的“排序规则”按钮。Enter your collation document.输入您的排序规则文档。
Create a View from Pipeline Results从管道结果创建视图
Creating a view from pipeline results does not save the pipeline itself.从管道结果创建视图不会保存管道本身。
To create a view from your pipeline results:要根据管道结果创建视图,请执行以下操作:
Click the arrow next to the Save button at the top of the pipeline builder.单击管道生成器顶部“保存”按钮旁边的箭头。Click Create a View.单击“创建视图”。Enter a name for your view.输入视图的名称。Click Create.单击“创建”。
Compass creates a view from your pipeline results in the same database where the pipeline was created.Compass根据管道结果在创建管道的同一数据库中创建视图。
Example实例
In this example, you create and run a pipeline for a collection with airline data. 在本例中,您为包含航空公司数据的集合创建并运行管道。You can download this dataset from the following link:您可以从以下链接下载此数据集:
air_airlines.json。
For instructions on importing JSON data into your cluster, see mongoimport. 有关将JSON数据导入集群的说明,请参阅mongoimport。This example assumes you have the data in the 本例假设您在example.air_airlines namespace.example.air_airlines名称空间中拥有数据。
Create the Pipeline创建管道
The following pipeline has two aggregation stages: $group and $match.以下管道有两个聚合阶段:$group和$match。
The$groupstage groups documents by theiractivestatus andcountry.$group阶段组按其active状态和country记录文档。The stage also adds a new该阶段还添加了一个新的flightCountfield containing the number of documents in each group.flightCount字段,其中包含每个组中的文档数。The$matchstage filters documents to return documents with aflightCountvalue greater than or equal to5.$match阶段筛选文档以返回flightCount值大于或等于5的文档。

Copy the Pipeline to the Clipboard将管道复制到剪贴板
-
Click the Export to Language button at the top of the pipeline builder.单击管道生成器顶部的“导出到语言”按钮。The following page displays:以下页面显示:
Click the Copy button in the My Pipeline panel on the left.单击左侧“我的管道”面板中的“复制”按钮。Compass copies the pipeline to your clipboard in mongo shell syntax.Compass以mongo shell语法将管道复制到剪贴板。You will use the pipeline in the following section.您将在下一节中使用管道。
Run the Pipeline铺设管道
Launch and connect to a mongod instance which contains the imported启动并连接到包含导入的air_airlines.jsondataset.air_airlines.json数据集的mongod实例。-
Switch to the切换到存在exampledatabase where theair_airlinescollection exists:air_airlines集合的example数据库:use example -
Run the following command to run the pipeline created in Compass:运行以下命令以运行在Compass中创建的管道:db.air_airlines.aggregate([{ $group: { _id: { active: '$active', country: '$country' }, flightCount: { $sum: 1 } } }, { $match: { flightCount: { $gte: 5 } } }])
The pipeline returns documents, as shown in the following abbreviated example:管道返回文档,如以下缩略示例所示:
{ "_id" : { "active" : "Y", "country" : "Nigeria" }, "flightCount" : 5 }
{ "_id" : { "active" : "N", "country" : "Switzerland" }, "flightCount" : 46 }
{ "_id" : { "active" : "N", "country" : "Bahrain" }, "flightCount" : 8 }
{ "_id" : { "active" : "N", "country" : "Guinea-Bissau" }, "flightCount" : 8 }
{ "_id" : { "active" : "N", "country" : "Argentina" }, "flightCount" : 14 }
{ "_id" : { "active" : "N", "country" : "Moldova" }, "flightCount" : 17 }
{ "_id" : { "active" : "Y", "country" : "Israel" }, "flightCount" : 6 }
{ "_id" : { "active" : "N", "country" : "Finland" }, "flightCount" : 7 }