Node.js
Node.js is a lightweight runtime environment for executing JavaScript outside the browser, for example on the server or in the command line. Node.js是一个轻量级运行时环境,用于在浏览器外部执行JavaScript,例如在服务器上或在命令行中。WebStorm integrates with Node.js providing assistance in configuring, editing, running, debugging, testing, profiling, and maintaining your applications.WebStorm与Node.js集成,在配置、编辑、运行、调试、测试、分析和维护应用程序方面提供帮助。
If you need Node.js only as a local runtime for your application or for managing npm packages, running JavaScript linters, build tools, test frameworks, and so on, just install Node.js. 如果您只需要Node.js作为应用程序的本地运行时,或者用于管理npm包、运行JavaScript过滤器、构建工具、测试框架等,只需安装Node.js即可。If you follow the standard installation procedure, in most cases WebStorm detects Node.js itself.如果遵循标准安装过程,大多数情况下WebStorm会检测Node.js本身。
And even if you have no Node.js on your computer, you can install it when creating a new Node.js application in the Create New Project dialog, see Creating a new Node.js application below.即使您的计算机上没有Node.js,您也可以在“创建新项目”对话框中创建新的Node.js应用程序时安装它,请参阅下面创建新的Node.js应用程序。
If you want to switch among several Node.js installations, they must be configured as local Node.js interpreters. 如果要在多个Node.js安装之间切换,必须将它们配置为本地Node.js解释器。In most cases, WebStorm detects Node.js installations, configures them as interpreters automatically, and adds them to the list where you can select the relevant one.在大多数情况下,WebStorm会检测Node.js安装,自动将其配置为解释器,并将其添加到列表中,您可以在其中选择相关的解释器。
To run a Node.js application remotely, configure it as a remote interpreter. 要远程运行Node.js应用程序,请将其配置为远程解释器。See Node.js with Docker for details. 有关详细信息,请参阅带有Docker的Node.js。
Switching between Node.js versions在Node.js版本之间切换
With WebStorm, you can have several installations of Node.js and switch between them while working on the same project.使用WebStorm,您可以安装多个Node.js,并在同一项目中进行切换。
Press Ctrl+Alt+S to open IDE settings and select Languages and Frameworks | Node.js and NPM.按Ctrl+Alt+S打开IDE设置并选择“语言和框架”|“Node.js和NPM”。-
On the Node.js and NPM page that opens, select the required Node.js installation from the Node Interpreter list.在打开的“Node.js和NPM”页面上,从“Node解释器”列表中选择所需的Node.js安装。If you followed the standard installation procedure, in most cases the required Node.js installation is on the list.如果遵循标准安装过程,在大多数情况下,所需的Node.js安装都在列表中。If the installation is missing, click如果缺少安装,请单击and configure it as a local interpreter manually.
并手动将其配置为本地解释器。
Using a system Node.js version使用system Node.js版本
With WebStorm, you can set the default system node alias as your project’s Node.js version. 使用WebStorm,可以将默认系统Node别名设置为项目的node.js版本。After that this version will be automatically used by all the tools that require Node.js and in all new run/debug configurations. 之后,所有需要Node.js的工具以及所有新的运行/调试配置都将自动使用此版本。In particular, this means that you will not have to update the settings for each tool if you install a new Node.js version and make it the default node alias in your system.特别是,这意味着,如果安装新的Node.js版本并使其成为系统中的默认Node别名,则不必更新每个工具的设置。
Press Ctrl+Alt+S to open IDE settings and select Languages and Frameworks | Node.js and NPM.按Ctrl+Alt+S打开IDE设置并选择“语言和框架”|“Node.js和NPM”。-
From the Node interpreter list, select node.从“Node解释器”列表中,选择node。
-
Specify this new Node.js interpreter where applicable, for example in your run/debug configurations or settings of specific tools.在适用的情况下指定这个新的Node.js解释器,例如在运行/调试配置或特定工具的设置中。
Configuring a local Node.js interpreter配置本地Node.js解释器
You may need to configure Node.js installation as an interpreter manually, for example, if Node.js is installed in a non-default location so WebStorm does not detect it automatically.您可能需要手动将Node.js安装配置为解释器,例如,如果Node.js安装在非默认位置,因此WebStorm不会自动检测到它。
Press Ctrl+Alt+S to open IDE settings and select Languages and Frameworks | Node.js and NPM.按Ctrl+Alt+S打开IDE设置并选择“语言和框架”|“Node.js和NPM”。-
Click单击“Node解释器”列表旁边的next to the Node Interpreter list.
。
-
In the Node.js Interpreters dialog that opens with a list of all the currently configured interpreters, click在打开的Node.js解释器对话框中,单击工具栏上的on the toolbar.
,该对话框列出了当前配置的所有解释器。
In the dialog that opens, choose Add Local from the context menu and choose the installation of Node.js, then click OK.在打开的对话框中,从关联菜单中选择“添加本地”并选择Node.js的安装,然后单击确定。You return to the Node.js Interpreters dialog where the Node interpreter read-only field shows the path to the new interpreter.返回“Node.js解释器”对话框,其中节点解释器只读字段显示新解释器的路径。 -
In the Package manager field, choose the package manager (npm, Yarn, or pnpm) for the current project.在“包管理器”字段中,为当前项目选择包管理器(npm、Yarn或pnpm)。See Configuring a package manager for a project for details.有关详细信息,请参阅为项目配置包管理器。
When you click OK, you return to the Node.js and NPM page where the Node interpreter field shows the new interpreter.单击确定后,返回“Node.js和NPM”页面,其中“Node解释器”字段显示新的解释器。
Using Node.js on Windows Subsystem for Linux在Windows的Linux子系统上使用Node.js
WebStorm lets you run and debug Node.js applications using Node.js on Windows Subsystem for Linux. WebStorm允许您在Linux的Windows子系统上使用Node.js运行和调试Node.js应用程序。You can choose Node.js on WSL as the default interpreter for the current project or you can configure and use this node version in a Node.js Run/Debug configuration.您可以选择WSL上的Node.js作为当前项目的默认解释器,也可以在Node.js运行/调试配置中配置和使用此Node版本。
Configure Node.js on WSL as the default project node interpreter将WSL上的Node.js配置为默认的项目节点解释器
-
In the Settings/Preferences dialog Ctrl+Alt+S, go to .在“设置/首选项”对话框Ctrl+Alt+S中,转到“语言和框架”|“Node.js和NPM”。 -
Click在打开的“Node.js解释器”对话框中,单击“节点解释器”字段旁边的next to the Node Interpreter field, in the Node.js Interpreters dialog that opens, click
, and then select Add WSL from the list.
,单击
,然后从列表中选择“添加WSL”。

-
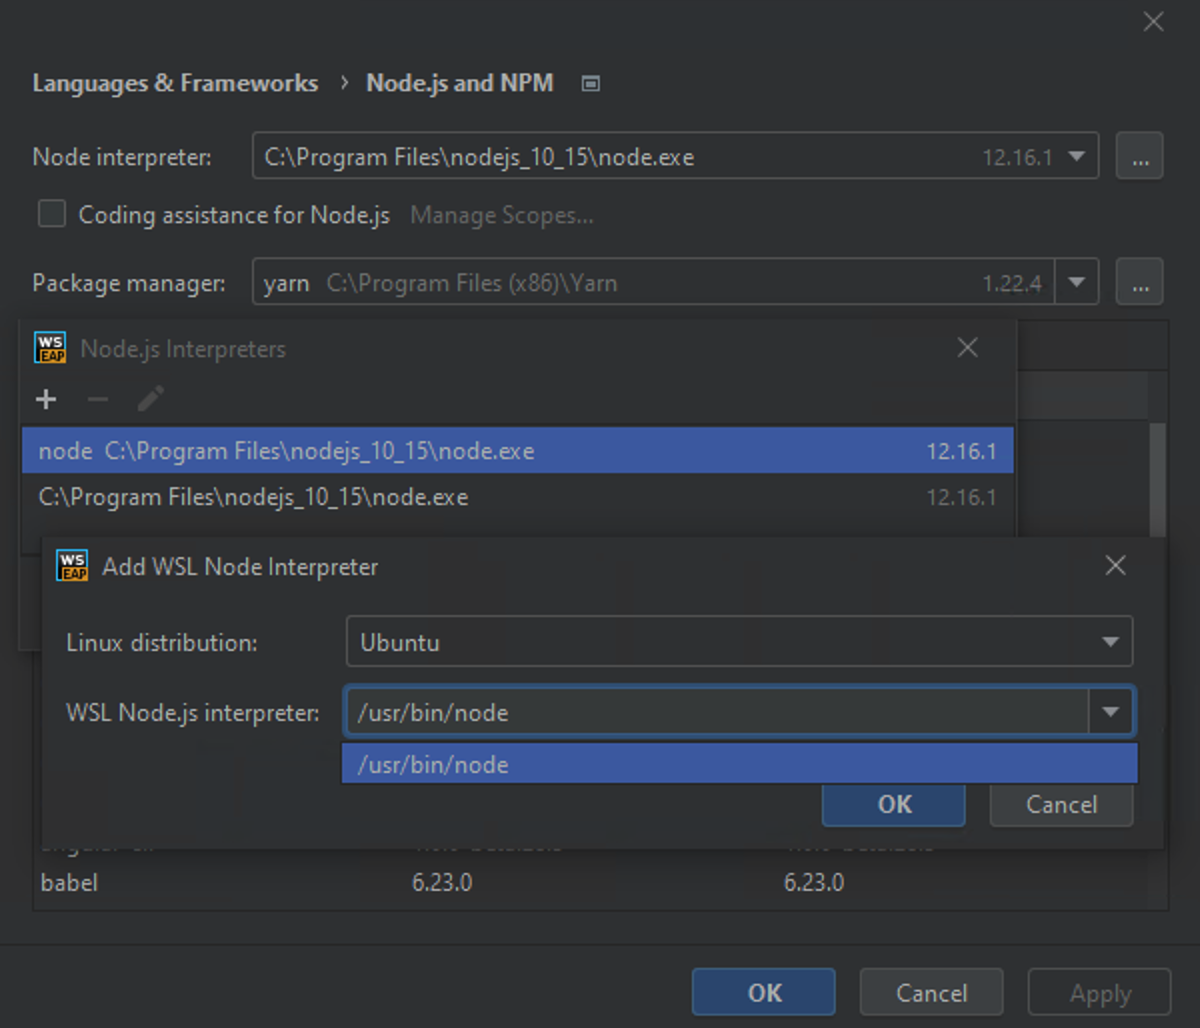
In the Add WSL Node Interpreter dialog that opens, select the Linux distribution you’re using and specify the path to Node.js.在打开的“添加WSL节点解释器对”话框中,选择您正在使用的Linux发行版,并指定Node.js的路径。
Creating a Node.js application创建Node.js应用程序
If you have no application yet, you can generate a WebStorm project with Node.js-specific structure from a template or create an empty WebStorm project and configure Node.js in it as described in Starting with an existing Node.js application below.如果您还没有应用程序,可以从模板生成一个特定于Node.js结构的WebStorm项目,或者创建一个空WebStorm项目并在其中配置Node.js,如下面从现有Node.js应用程序开始所述。
Create a new Node.js application创建一个新的Node.js应用程序
Click Create New Project on the Welcome screen or select from the main menu.单击“欢迎”屏幕上的“新建项目”,或从主菜单中选择“文件”|“新建”|“项目”。The Create New Project Dialog opens.此时将打开“创建新项目”对话框。-
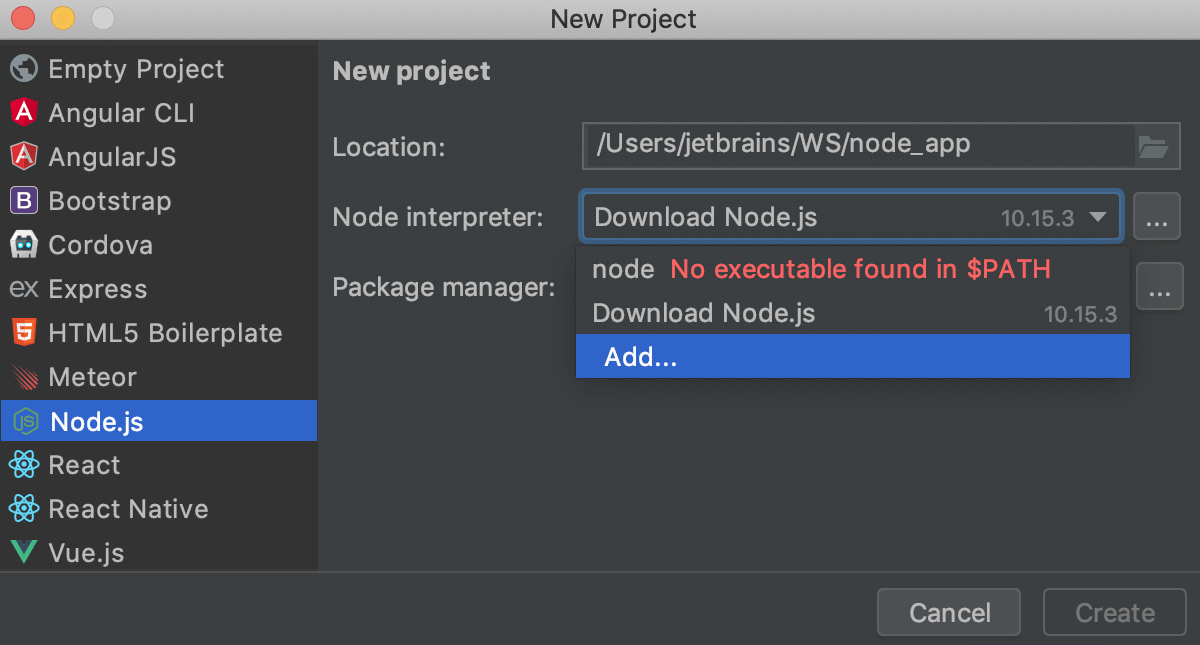
In the left-hand pane, choose Node.js to create a basic Node.js application or Express to create an Express application.在左侧窗格中,选择“Node.js”创建基本Node.js应用程序,或选择“Express”创建Express应用程序。 -
In the right-hand pane, specify the project folder, the Node.js interpreter, and the package manager (npm or Yarn, see npm, pnpm, and Yarn for details).在右侧窗格中,指定项目文件夹、Node.js解释器和包管理器(npm或Yarn,有关详细信息,请参阅npm、pnpm和Yarn)。If you have only one Node.js on your machine and you followed the standard installation procedure, WebStorm detects your Node.js automatically.如果您的计算机上只有一个Node.js,并且您遵循标准安装过程,那么WebStorm会自动检测您的Node.js。Otherwise, choose the relevant interpreter from the list, see Configuring a local Node.js interpreter above.否则,请从列表中选择相关的解释器,请参阅上面的配置本地Node.js解释器。If you have no Node.js installed, select Download Node.js.如果未安装Node.js,请选择“下载Node.js”。
For Express applications, specify the express -generator in the express-generator field.对于Express应用程序,请在express-generator段中指定Express生成器。It is recommended that you use npx that downloads and runs the generator.建议您使用下载并运行生成器的npx。To do that, select npx --package express-generator express from the express -generator list.为此,从express -generator列表中选择npx --package express-generator express。Alternatively, open the embedded Terminal(Alt+F12) and type或者,打开嵌入式终端(Alt+F12)并键入npm install --g express-generatorand then select the downloaded generator from the express-generator list.npm install --g express-generator,然后从“express-generator”列表中选择下载的生成器。
Select the template language and the Style Sheet language to use.选择要使用的模板语言和样式表语言。 -
When you click Create, WebStorm downloads the necessary dependencies and enables code completion for them as well as for the Node.js core APIs, see Configuring node_modules library and Configuring Node.js Core library for details.单击“创建”时,WebStorm将下载必要的依赖项并为它们以及Node.js核心API启用代码完成,有关详细信息,请参阅配置Node_module库和配置Node.js核心库。For Express, WebStorm creates a run/debug configuration of the type Node.js with default settings and generates a basic Express-specific directory structure.对于Express,WebStorm使用默认设置创建Node.js类型的运行/调试配置,并生成基本的特定于Express的目录结构。For Node.js, WebStorm just runs the对于Node.js,WebStorm只运行npm initcommand to generate a package.json file.npm init命令来生成package.json文件。
Create an empty WebStorm project创建一个空的WebStorm项目
-
Click Create New Project on the Welcome screen or select from the main menu.单击“欢迎”屏幕上的“新建项目”,或从主菜单中选择“文件”|“新建”|“项目”。The Create New Project Dialog opens.此时将打开“创建新项目”对话框。 -
In the left-hand pane, choose Empty Project.在左侧窗格中,选择空项目。In the right-hand pane, specify the application folder and click Create.在右侧窗格中,指定应用程序文件夹并单击“创建”。
Starting with an existing Node.js application从现有的Node.js应用程序开始
If you are going to continue developing an existing Node.js application, open it in WebStorm, configure Node.js in it, and download the required dependencies.如果要继续开发现有的Node.js应用程序,请在WebStorm中打开它,在其中配置Node.js,并下载所需的依赖项。
Open the application sources that are already on your machine打开计算机上已有的应用程序源
-
Click Open on the Welcome screen or select from the main menu.单击“欢迎”屏幕上的“打开”,或从主菜单中选择“文件”|“打开”。In the dialog that opens, select the folder where your sources are stored.在打开的对话框中,选择存储源的文件夹。
Check out the application sources from your version control从版本控制中签出应用程序源
-
Click Get from VCS on the Welcome screen or select from the main menu.单击“欢迎”屏幕上的“从VCS获取”或从主菜单选择“<Your_VCSgt;”|“获取版本控制”。<Your_VCS>
stands for the Version Control System with which your currently opened project is associated.表示与当前打开的项目关联的版本控制系统。 -
In the invoked dialog, select your version control system from the list and specify the repository to check out the application sources from.在调用的对话框中,从列表中选择您的版本控制系统,并指定要从中检出应用程序源的存储库。
Configure Node.js in a project在项目中配置Node.js
-
In the Settings/Preferences dialog Ctrl+Alt+S, go to .在“设置/首选项”对话框Ctrl+Alt+S中,转到“语言和框架”|“Node.js和NPM”。 -
In the Node Interpreter field, specify the default Node.js interpreter for the current project.在“Node解释器”字段中,为当前项目指定默认的Node.js解释器。WebStorm will automatically use it every time you select the在创建运行/调试配置或配置Node.js相关工具(例如,Prettier或ESLint)时,每当您从“Node解释器”列表中选择Projectalias from Node Interpreter lists when creating run/debug configurations or configuring Node.js-dependent tools, for example, Prettier or ESLint.Project别名时,WebStorm都会自动使用它。Select a configured interpreter from the list or click从列表中选择配置解释器,或点击and configure a new one in the dialog that opens as described in Configuring a local Node.js interpreter.
,并在对话框中配置一个新的解释器,打开成如配置本地Node.js解释器所述。
If you select node, the system Node.js version is used.如果选择node,则使用system node.js版本。 -
Select the Coding assistance for Node.js checkbox to configure the Node.js Core module sources as a JavaScript library and associate it with your project.选择Node.js的编码助手复选框,以将Node.js核心模块源配置为一个JavaScript库,并把它与你的项目关联起来。As a result, WebStorm provides code completion, reference resolution, validation, and debugging capabilities for因此,WebStorm为fs,path,http, and other parts of Node.js that are compiled into the Node.js binary.fs、path、http和Node.js中编译成Node.js二进制文件的其他部分提供了代码完成、引用解析、验证和调试功能。When the configuration is completed, WebStorm displays information about the currently configured version.配置完成后,WebStorm将显示有关当前配置版本的信息。 -
If you need code completion for Node.js APIs only in some parts of your project, you can configure that using the Manage scopes link.如果仅在项目的某些部分需要Node.js API的代码完成,可以使用管理作用域链接进行配置。In the Usage dialog that opens, click the relevant directories and for each of them select the configured Node.js Core library from the list.在打开的“用例”对话框中,单击相关目录,并从列表中为每个目录选择已配置的Node.js Core库。Learn more from Configuring the scope of a library.通过配置库的作用域了解更多信息。
Download the project dependencies下载项目依赖项
-
In the embedded Terminal(Alt+F12), type:在嵌入式“终端”(Alt+F12)中,键入:npm install -
Alternatively, select Run 'npm install' from the context menu of the package.json file in your project root.或者,从项目根目录中package.json文件的上下文菜单中选择运行“npm install”。