Chapter 1. Quick Start快速起步
The WebSocket API and protocol is defined in RFC 6455. WebSocket API和协议在RFC 6455中定义。WebSocket gives you a bidirectional, full-duplex communications channel that operates over HTTP through a single socket.WebSocket为您提供了一个双向、全双工的通信通道,该通道通过单个套接字通过HTTP进行操作。
Existing hacks that run over HTTP (like long polling) send requests at intervals, regardless of whether messages are available, without any knowledge of the state of the server or client. 在HTTP上运行的现有黑客攻击(如长轮询)每隔一段时间发送请求,而不管消息是否可用,也不知道服务器或客户端的状态。The WebSocket API, however, is different - the server and client have an open connection from which they can send messages back and forth. 然而,WebSocket API是不同的——服务器和客户机有一个开放的连接,它们可以从中来回发送消息。For the security minded, WebSocket also operates over Transport Layer Security (TLS) or Secure Sockets Layer (SSL) and is the preferred method, as you will see in Chapter 6.出于安全考虑,WebSocket还可以通过传输层安全性(TLS)或安全套接字层(SSL)进行操作,是首选方法,你将在第6章中读到它。
This book will help you understand the WebSocket API, the protocol, and how to use it in your web applications today.这本书将帮助您理解WebSocket API、协议,以及如何在当今的web应用程序中使用它。
In this book, JavaScript is used for all code examples. Node.js is used for all server code, and for occasional client code or tests when a browser is extraneous to getting a sense of functionality. To understand the examples, you’ll need some level of proficiency with JavaScript. If you’d like to study up on JavaScript, I recommend Douglas Crockford’s JavaScript: The Good Parts (O’Reilly).
Node.js has been so prevalant in the past several years that the barriers to entry for the examples in this book are remarkably low. If you’ve done any development for the Web, chances are good that you’ve developed in JavaScript or at least understand it. The use of Node.js and JavaScript throughout, then, is meant only to simplify the teaching process, and should not be construed as a requirement for a WebSocket project.
Libraries and servers are available that support WebSocket in nearly every possible configuration. Chapter 5 covers several options for deploying a WebSocket-capable server, including fallback methods for clients that don’t offer support for this technology yet.
Getting Node and npm
To ensure that you can run all of the examples in the book, I strongly recommend that you install Node.js and npm in your development environment. While you can learn all about WebSocket without touching any code, I don’t recommend it. The following sections indicate a few simple ways to get Node in your environment.
Installing on Windows
I cover only downloading and installing the precompiled binary available on Windows. If you are masochistic and would like to compile it yourself, you can follow the instructions.
For the rest of you, download the standalone Windows executable. Then grab the latest .zip archive of npm. Unpack the npm .zip, and place the downloaded node.exe in a directory you add to your PATH. You’ll be able to run scripts and install modules using Node.js and npm, respectively.
Installing on OS X
Two of the easiest methods of installing Node.js and npm are via a precompiled downloadable package, or via a package manager. My preference is to use a package manager like Homebrew to get Node.js onto your machine. This allows for quick and easy updating without having to redownload a package from the Web. Assuming you have Homebrew installed, run this command:
brew install node
And if you’d rather use the available precompiled binaries, you can find the download at the Node.js site. When you’d like to install an updated version of Node.js, download and install the latest package and it will overwrite the existing binaries.
Installing on Linux
Because there are more flavors of Linux than stars in the sky, I’ll outline only how to compile it yourself, and how to get it via apt on Ubuntu. If you’re running another distro and would like to use the package manager available on your particular flavor, visit the Node.js wiki for instructions on installing.
Using apt to install Node.js requires a few simple steps:
sudo apt-get update
sudo apt-get install python-software-properties python g++ make
sudo add-apt-repository ppa:chris-lea/node.js
sudo apt-get update
sudo apt-get install nodejs
This installs the current stable Node.js onto your Ubuntu distro, ready to free JavaScript from the browser and let you write some server-side code.
If you’d like to compile it yourself, assuming Git is already installed and available on your machine, type the following:
git clone git://github.com/joyent/node.gitcdnode git checkout v0.10.7 ./configure&&make&&make install
Note
Check http://nodejs.org/ for the latest version of Node.js to check out onto your system.
Hello, World! Example
When tackling a new topic in development, I prefer to start with an example fairly quickly. So we’ll use the battle-tested example across languages—“Hello, World!”—to initiate a connection to a WebSocket-capable Node.js server, and receive the greeting upon connection.
You’ll start by writing code that starts a WebSocket-capable server on port 8181. First, you will use the CommonJS idiom and require the ws module and assign that class to the WebSocketServer object.
Then you’ll call the constructor with your initialization object, which consists of the port definition, or which contains the port definition.
The WebSocket protocol is essentially a message-passing facility. To begin, you will listen for an event called connection. Upon receiving a connection event, the provided WebSocket object will be used to send back the “Hello, World!” greeting.
To make life a bit simpler, and because I don’t fancy reinventing the wheel, the wonderful WebSocket library called ws will be used. The ws library can take a lot of the headache out of writing a WebSocket server (or client) by offering a simple, clean API for your Node.js application.
Install it using npm:
npm install ws
Another popular option is to use the WebSocket-Node library.
All of this book’s examples will assume that the source code exists in a folder denoted by the abbreviated chapter name, so create a directory called ch1. Now create a new file called server.js in your editor of choice and add this code for your application:
varWebSocketServer=require('ws').Server,wss=newWebSocketServer({port:8181});wss.on('connection',function(ws){console.log('client connected');ws.on('message',function(message){console.log(message);});});
Short and to the point. Next, run the server so it’s listening for the client you’re about to code:
node server.js
Create a file for the client called client.html and place it in the same directory as the server file. With this simple example, the client can be hosted anywhere, even run from the file:// protocol. In later chapters, you’ll use HTTP libraries and require a more web-centric focus for file and directory management.
In this first pass, however, you’ll use a basic HTML page to call the WebSocket server. The structure of the HTML page is a simple form, with a text field and a button to initiate the send. The two methods of sending your message will be submitting a form (via Return/Enter) or clicking the Send! button. Then you’ll add an action on the form submit and the onclick event of the button to call the sendMessage JavaScript function. One thing to note is that the code returns false in the form’s onsubmit so the page doesn’t refresh.
The WebSocket initialization is rather simple; you initiate a connection to a WebSocket server on port 8181 on localhost. Next, because the WebSocket API is event-based (more about this later), you define a function for the onopen event to output a status message for a successful connection to the server. The sendMessage function merely has to call the send function on the variable ws and grab the value inside the message text field.
And voila! You have your first WebSocket example.
<!DOCTYPE html><htmllang="en"><head><title>WebSocket Echo Demo</title><metacharset="utf-8"><metaname="viewport"content="width=device-width, initial-scale=1"><linkrel="stylesheet"href="http://bit.ly/cdn-bootstrap-css"><linkrel="stylesheet"href="http://bit.ly/cdn-bootstrap-theme"><scriptsrc="http://bit.ly/cdn-bootstrap-jq"></script><script>varws=newWebSocket("ws://localhost:8181");ws.onopen=function(e){console.log('Connection to server opened');}functionsendMessage(){ws.send($('#message').val());}</script></head><bodylang="en"><divclass="vertical-center"><divclass="container"><p> </p><formrole="form"id="chat_form"onsubmit="sendMessage(); return false;"><divclass="form-group"><inputclass="form-control"type="text"name="message"id="message"placeholder="Type text to echo in here"value=""autofocus/></div><buttontype="button"id="send"class="btn btn-primary"onclick="sendMessage();">Send!</button></form></div></div><scriptsrc="http://bit.ly/cdn-bootstrap-minjs"></script></body></html>
Throughout the book you will use the two wonderful libraries prevalent on the Web for display and interaction:
Note
In later examples, we’ll dispense with including the script and CSS style tags in favor of brevity. You can use the preceding HTML as a template for future examples, and just remove the content of the custom <script> tag and the contents between the <body> tags while keeping the Bootstrap JavaScript include intact.
With that, open the HTML page in your favorite browser (I suggest Google Chrome or Mozilla Firefox). Send a message and watch it show up in your server’s console output.
If you’re using Chrome, it has an excellent facility for viewing WebSocket connections from the frontmost page. Let’s do this now. From the hotdog menu, choose Tools → Developer Tools (on Windows: F12, Ctrl-Shift-I; on a Mac ⌥-⌘-I).
Figure 1-1 shows the Google Chrome Developer Tools filtered for WebSocket calls. Echo is the first app to be written in the networking space.
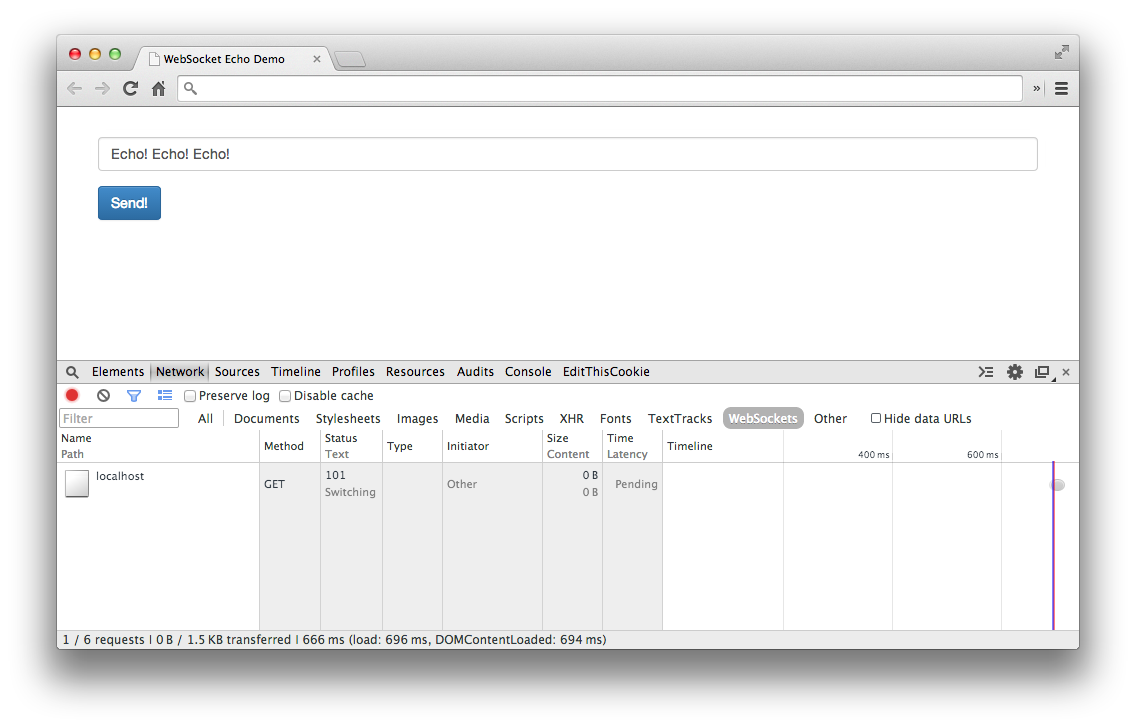
Figure 1-1. Chrome Developer Tools—Network tab
Select the Network tab and refresh the example HTML. In the table you should see an entry for the HTML, and an entry for the WebSocket connection with status of “101 Switching Protocols.” If you select it, you’ll see the Request Headers and Response Headers for this connection:
GET ws://localhost:8181/ HTTP/1.1
Pragma: no-cache
Origin: null
Host: localhost:8181
Sec-WebSocket-Key: qalODNsUoRp+2K9FJty55Q==
User-Agent: Mozilla/5.0 (Macintosh; Intel Mac OS X 10_8_3)...
Upgrade: websocket
Sec-WebSocket-Extensions: x-webkit-deflate-frame
Cache-Control: no-cache
Connection: Upgrade
Sec-WebSocket-Version: 13
HTTP/1.1 101 Switching Protocols
Connection: Upgrade
Sec-WebSocket-Accept: nambQ7W9imtAIYpzsw4hNNuGD58=
Upgrade: websocket
If you’re used to seeing HTTP headers, this should look no different. We do have a few extra headers here, including Connection: Upgrade, Sec-Websocket-Key, Upgrade: websocket, which I’ll explain further in Chapter 8. For now, relish in your first WebSocket example, and get ready to learn why WebSocket should be on your radar for your next project.
Why WebSocket?
The ability today to create desktop-like applications in the browser is achieved primarily by using Comet and Ajax. To use either solution, developers have relied on hacks in servers and clients alike to keep connections open longer and fake a long-running connection.
While these hacks technically work, they create resource allocation issues on servers. With existing methods, the perceived latency to the end user may be low, but the efficiency on the backend leaves a lot to be desired. Long polling makes unnecessary requests and keeps a constant stream of opening and closing connections for your servers to deal with. There is no facility for layering other protocols on top of Comet or Ajax, and even if you could, the simplicity is just not there.
WebSocket gives you the ability to use an upgraded HTTP request (Chapter 8 covers the particulars), and send data in a message-based way, similar to UDP and with all the reliability of TCP. This means a single connection, and the ability to send data back and forth between client and server with negligible penalty in resource utilization. You can also layer another protocol on top of WebSocket, and provide it in a secure way over TLS. Later chapters dive deeper into these and other features such as heartbeating, origin domain, and more.
One of the common pitfalls of choosing between WebSocket and long polling was the sad state of browser support. Today, the state of browser support for WebSocket is much brighter for the end user.
Table 1-1 shows the current state of browser support for WebSocket. For the most up-to-date information on WebSocket support, you can reference the Can I Use website.
| Browser | No support | Partial support | Full support |
|---|---|---|---|
IE |
Versions 8.0, 9.0 |
Version 10.0 and up |
|
Firefox |
Version 27.0 and up |
||
Chrome |
Version 31.0 and up |
||
Safari |
Version 7 and up |
||
Opera |
Version 20.0 and up |
||
iOS Safari |
Versions 3.2, 4.0–4.1 |
Versions 4.2–4.3, 5.0–5.1 |
Version 6.0 and up |
Opera Mini |
Versions 5.0–7.0 |
||
Android Browser |
Versions 2.1–4.3 |
Version 4.4 |
|
BlackBerry Browser |
Versions 7.0, 10.0 |
||
IE Mobile |
Version 10.0 |
As you’ll discover in Chapter 5, you can mitigate the lack of support in older browsers for native WebSocket by using framework libraries such as SockJS or Socket.IO.
Summary
This chapter introduced WebSocket and how to build a simple echo server using Node.js. You saw how to build a simple client for testing your WebSocket server, along with one simple way to test your WebSocket server using Chrome Developer Tools. The next chapters explore the WebSocket API, and the protocol, and you’ll learn how to layer other protocols on top of WebSocket to give you even more power.